Workflow Management
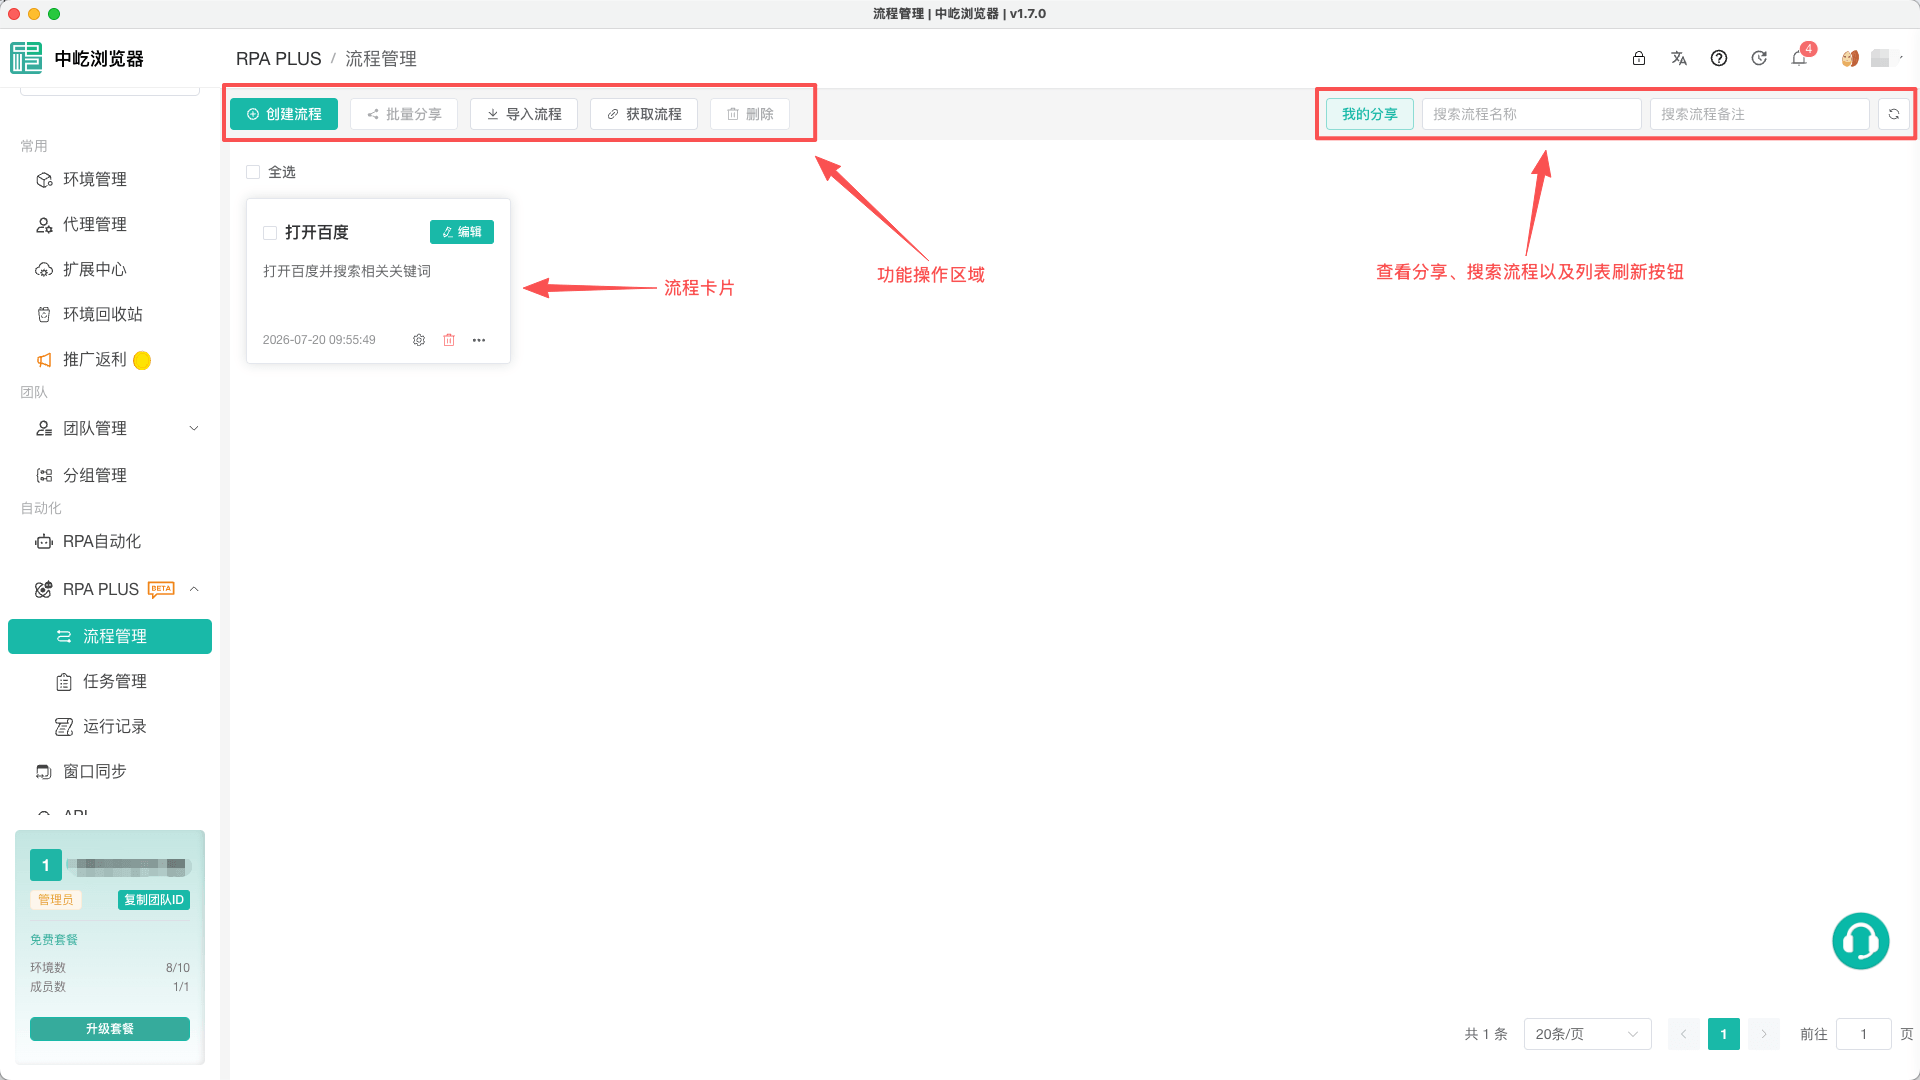
Workflow Management is the central entry for RPA workflows. Create and find workflows, edit their details, or copy, delete, import, export, and share them.
View and Find Workflows
Workflows appear as cards containing the name, notes, and creation time. Long notes display up to three lines.
Two independent search conditions are available:
- Workflow name: Find keywords in a name.
- Workflow notes: Narrow results using note content.
Click the refresh icon beside the search fields to load the latest data. Display 20, 50, or 100 workflows per page.
Create a Workflow
- Open RPA > Workflow Management.
- Click Create Workflow.
- Enter a workflow name and notes in the editor.
- Add nodes and save the workflow.
A new workflow automatically contains a Start node. This fixed entry cannot be deleted.
For a complete first-time example, see Create an Automation Workflow.
Open and Edit a Workflow
Click Edit on a card to enter the workflow editor and modify nodes, connections, variables, and settings.
To change only the name or notes, click the edit icon beside the workflow name without opening the canvas. Confirm the change to update the card.
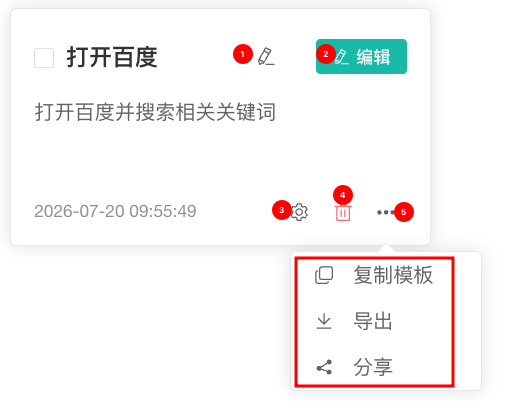
| No. | Feature | Description |
|---|---|---|
| 1 | Edit details | Changes the workflow name and notes |
| 2 | Edit workflow | Opens the editor to change nodes, connections, variables, and workflow settings |
| 3 | Workflow Settings | Changes shared workflow settings without opening the canvas |
| 4 | Delete workflow | Deletes the workflow after confirmation |
| 5 | More actions | Opens Copy as Template, Export Workflow, and Share Workflow |
Change Workflow Settings Directly
Click the settings icon at the bottom of a card to open Workflow Settings. Configure layout direction, Auto-connect, default error handling, runtime timeout, browser behavior, and other options.
These settings affect subsequent editing and execution. See Workflow Settings for definitions and defaults.
Copy a Workflow
To build a similar workflow from an existing one, open More Actions and select Copy as Template.
The copy is created as a separate workflow with a name in this format:
Original workflow name_Copy_timestampThe copy and original are saved independently. Editing or deleting the copy does not affect the original, making it suitable for a test version or business template.
Delete Workflows
Delete One Workflow
- Click the delete icon at the bottom of its card.
- Verify the workflow name in the confirmation.
- Confirm deletion.
Before deleting, confirm that no task still uses the workflow. Existing tasks report that the workflow is missing and cannot be submitted or started normally after deletion.
Delete Workflows in Bulk
- Select the workflow cards to delete.
- Click Delete at the top.
- Confirm the batch action.
Select All applies only to the current page. Process each page separately when required.
Select Workflows in Bulk
Select workflows to share or delete them in bulk.
Before changing the search or page, confirm that the selection still matches the intended operation.
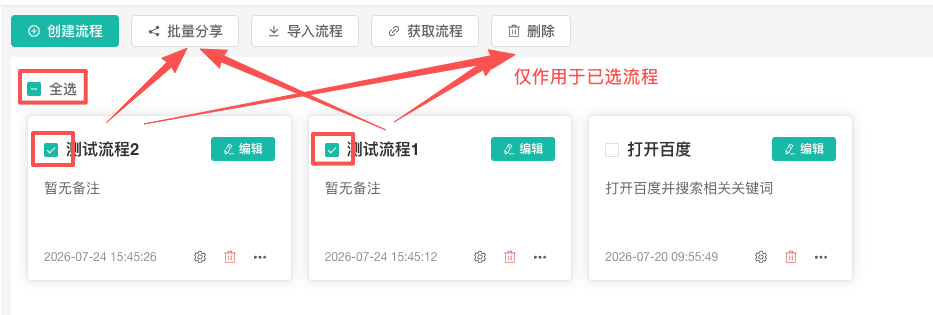
| Visual state | Meaning |
|---|---|
| Not selected | No workflow on the page is selected and batch actions are unavailable |
| Partially selected | Some workflows on the page are selected and Select All is indeterminate |
| Selected | Every workflow on the current page is selected |
| Batch action arrow | Batch sharing and deletion apply only to selected workflows |
Import, Export, and Share
Workflow Management provides these reuse options:
| Action | Use case | Consideration |
|---|---|---|
| Import Workflow | Create a workflow from a local .json file or pasted canvas JSON | Nodes, connections, and workflow structure are validated before import |
| Export Workflow | Save the latest canvas for one workflow as JSON | Does not include its name, notes, or Workflow Settings and is not a complete backup |
| Share Workflow | Generate a share code for another user | Can limit redemption count and validity period |
| Get Workflow | Add a workflow shared by another user with a share code | Creates an editable workflow in the local list |
See Import and Export Workflows and Share and Get Workflows for detailed steps.
Recommendations
- Use a name that identifies the business goal, such as
Daily Product Inventory Check. - Record applicable accounts, data sources, or maintainers in Notes for search and handover.
- Copy a production workflow before changing it and validate the test version before updating the task workflow.
- Remove obsolete test workflows regularly and always verify the workflow assigned to a task before execution.
Next Steps
- Use the Workflow Editor: Learn the canvas, nodes, connections, and editing tools.
- Workflow Settings: Configure layout, error handling, and runtime behavior.
- Import and Export Workflows: Migrate or reuse a workflow canvas.
- Share and Get Workflows: Collaborate through share codes.