Create and Edit a Browser Profile
Create profiles individually when each one requires separate configuration. The page provides Quick Create and Advanced Configuration modes and remembers the mode used for the most recent successful submission.
Open the Creation Page
- Go to
Browser Profiles. - Click
Create Profilein the upper-left corner. - Select
Quick CreateorAdvanced Configurationbased on your requirements.
If the button is unavailable, the current member does not have permission to create profiles. Ask a team administrator to grant the required permission.
Use Quick Create
Quick Create includes the most frequently used fields and applies the default fingerprint from Preferences. Complete the fields in this order:
- Enter a
Profile Name. - Select a browser engine and version.
- Select an operating system and version.
- Select a profile group.
- Add notes.
- Select a method under
Proxy Settings.
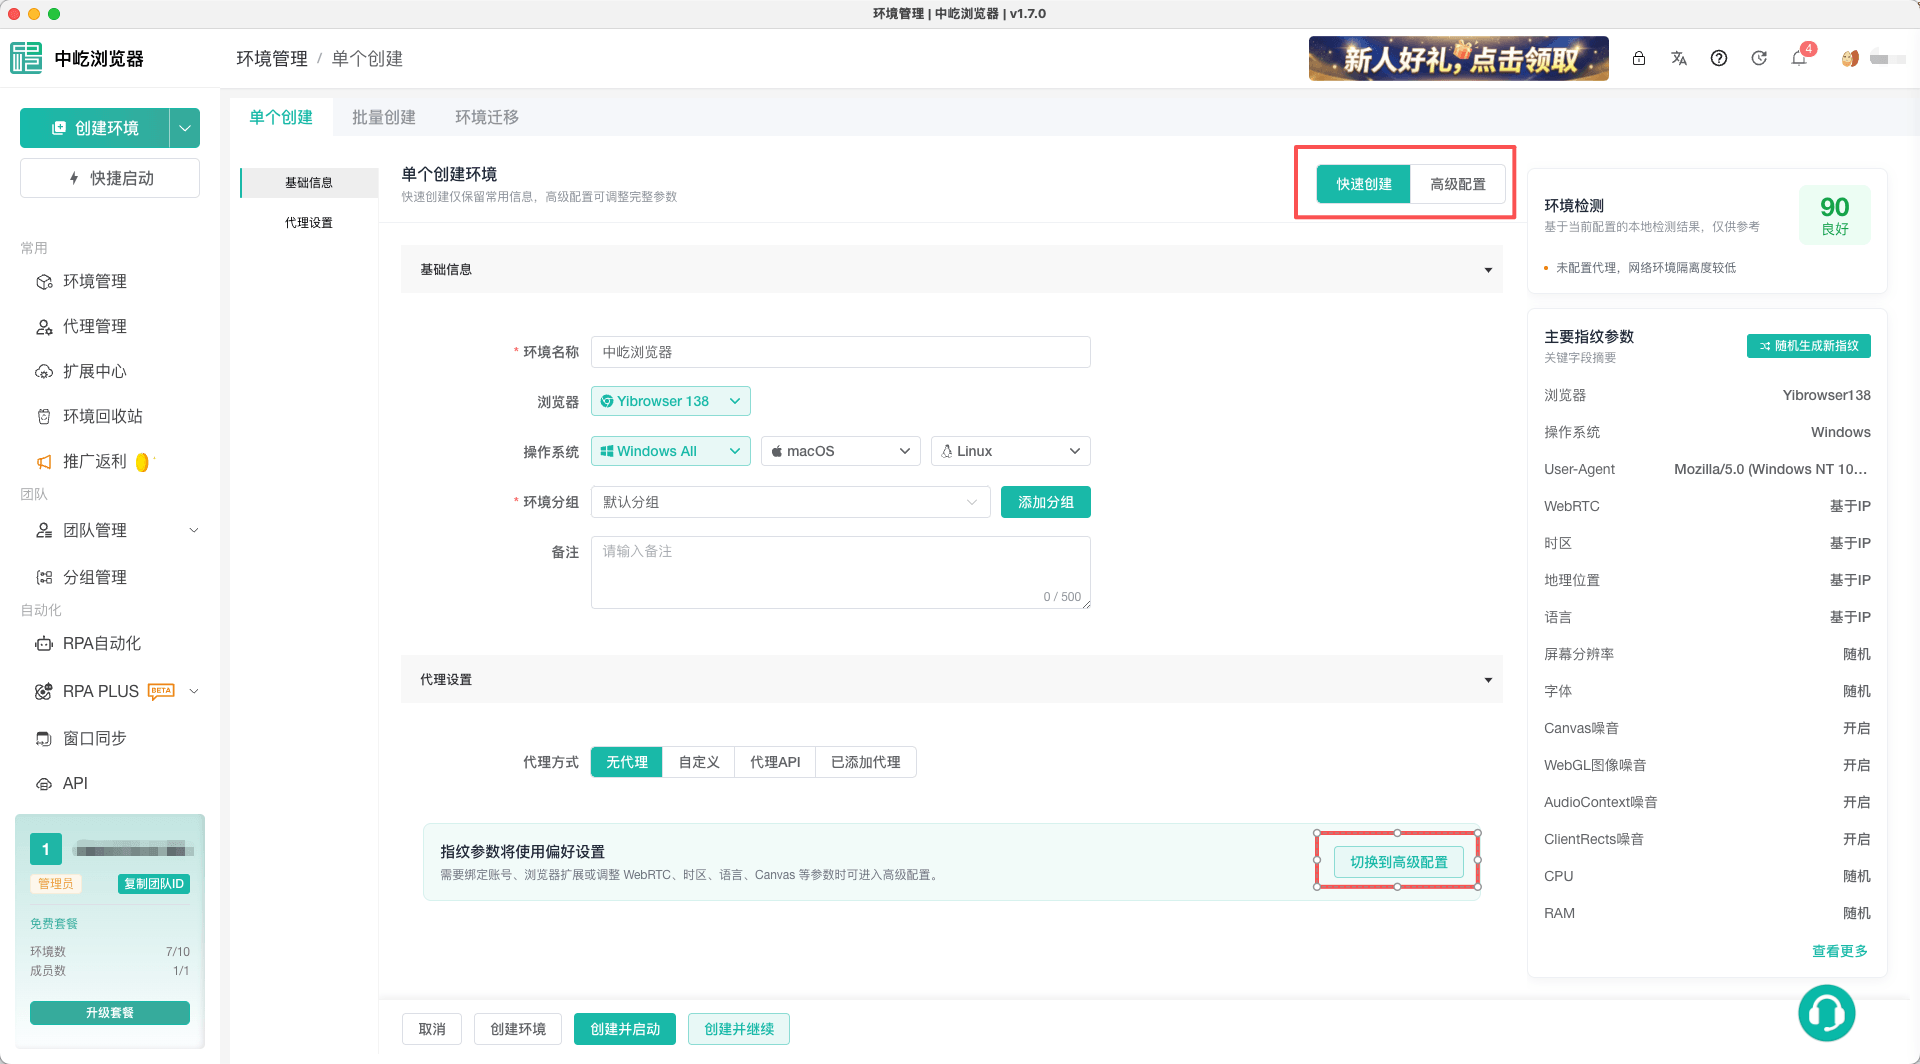
Quick Create does not show account, extension, common setting, or full fingerprint fields. The Profile Check and Primary Fingerprint Parameters remain available on the right. To address a warning, click View More or Switch to Advanced Configuration.
TIP
ZYBrowser remembers the creation mode used for your last successful submission and selects the same mode the next time you create a profile.
Select a Proxy Method
An individual profile supports four proxy methods:
| Method | Required information | Usage |
|---|---|---|
No Proxy | None | Uses the computer's direct network egress |
Custom | Proxy protocol, IP protocol, host, and port; username and password are optional | Click Test Proxy in the desktop client to check connectivity. The host accepts an IP address or domain, and you can paste host:port |
Proxy API | Proxy protocol, IP protocol, fetch policy, authentication type, and API URL; credential authentication also requires an account and password | The URL must include http:// or https://. Authentication defaults to an IP allowlist, or you can select credentials when required by the provider |
Saved Proxy | Select an existing proxy from the proxy list | A proxy must be selected before saving |
Proxy testing and API validation require local client capabilities. The web app can save cloud configuration but cannot perform local tests or launch profiles.
Recommendation
Manage proxies in the Proxies module instead of entering proxy details directly on the profile creation page.
- For rotating proxies with a fetch URL, configure the API under Proxies > Proxy API.
- For static proxies, configure them under Proxies > Custom Proxies.
After configuration, select the saved proxy when creating the profile.
Warning
Proxy usernames, passwords, and API URLs may be sensitive credentials. Never expose real values in screenshots, notes, or public documentation.
Use Advanced Configuration
Switch to Advanced Configuration to access the complete form:
| Section | Available settings |
|---|---|
Basic Information | Profile name, window dimensions, browser, operating system, UA version, custom User-Agent, group, cookies, and notes |
Proxy Settings | No Proxy, Custom, Proxy API, or Saved Proxy |
Account Settings | Create an account record or select an existing account and assign it to the profile |
Extension Settings | Select personal, team, and global extensions |
Common Settings | Control webpage behavior for images, audio, notifications, and more, and decide whether network changes should stop the launch |
Fingerprint Settings | Configure WebRTC, time zone, geolocation, language, resolution, fonts, hardware information, and other browser characteristics |
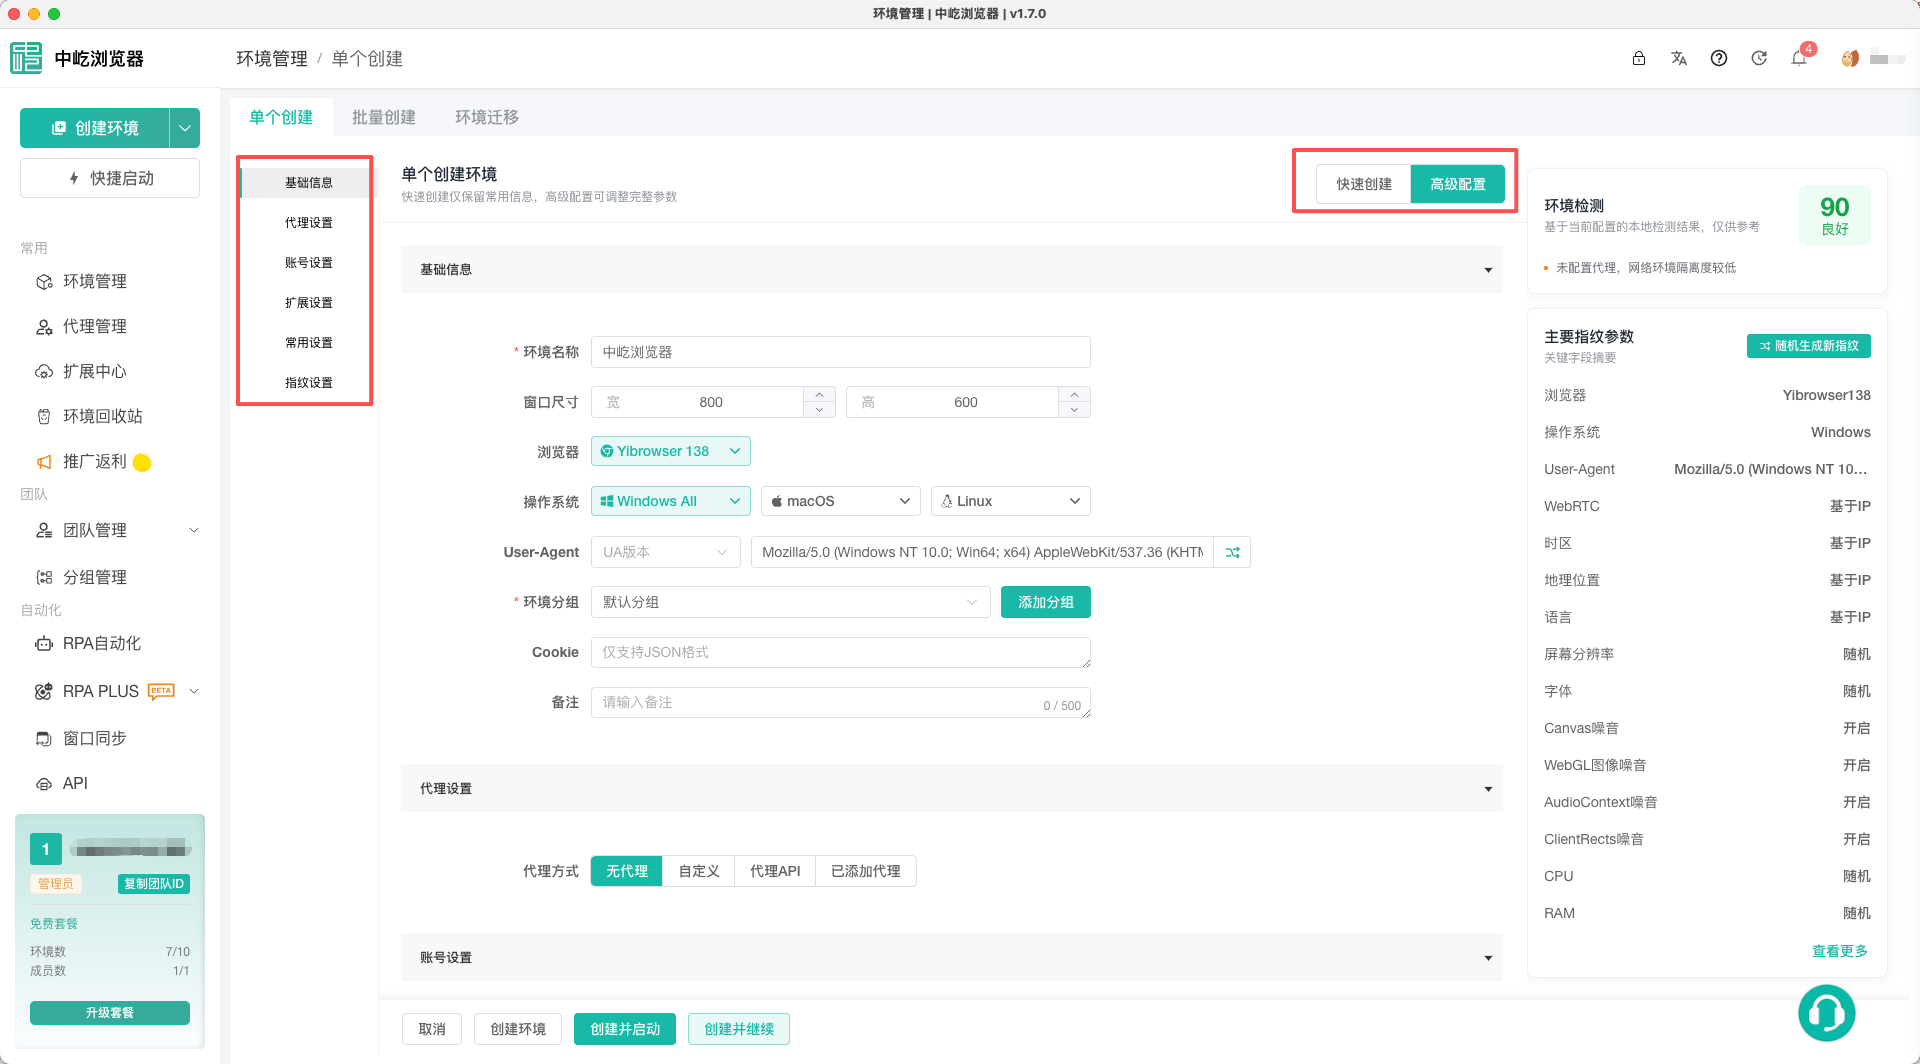
Cookies must be a JSON array. Every item must be an object containing at least name and value:
[
  {
    "name": "session_id",
    "value": "example-value"
  }
]
Warning
Enter real cookies only in the local form. Never save active login sessions in public files or screenshots.
For centralized account or extension management, see Assign a Browser Profile and Select the Load Scope.
Select a Submission Action
The following actions are available for a new profile:
| Action | Result |
|---|---|
Create Profile | Saves the profile and returns to the profile list |
Create and Launch | Saves and immediately launches the new profile in the desktop client, then returns to the list |
Create and Continue | Saves the profile, resets the form, and remains on the page for the next profile |
Cancel | Discards the current form and returns to the profile list |
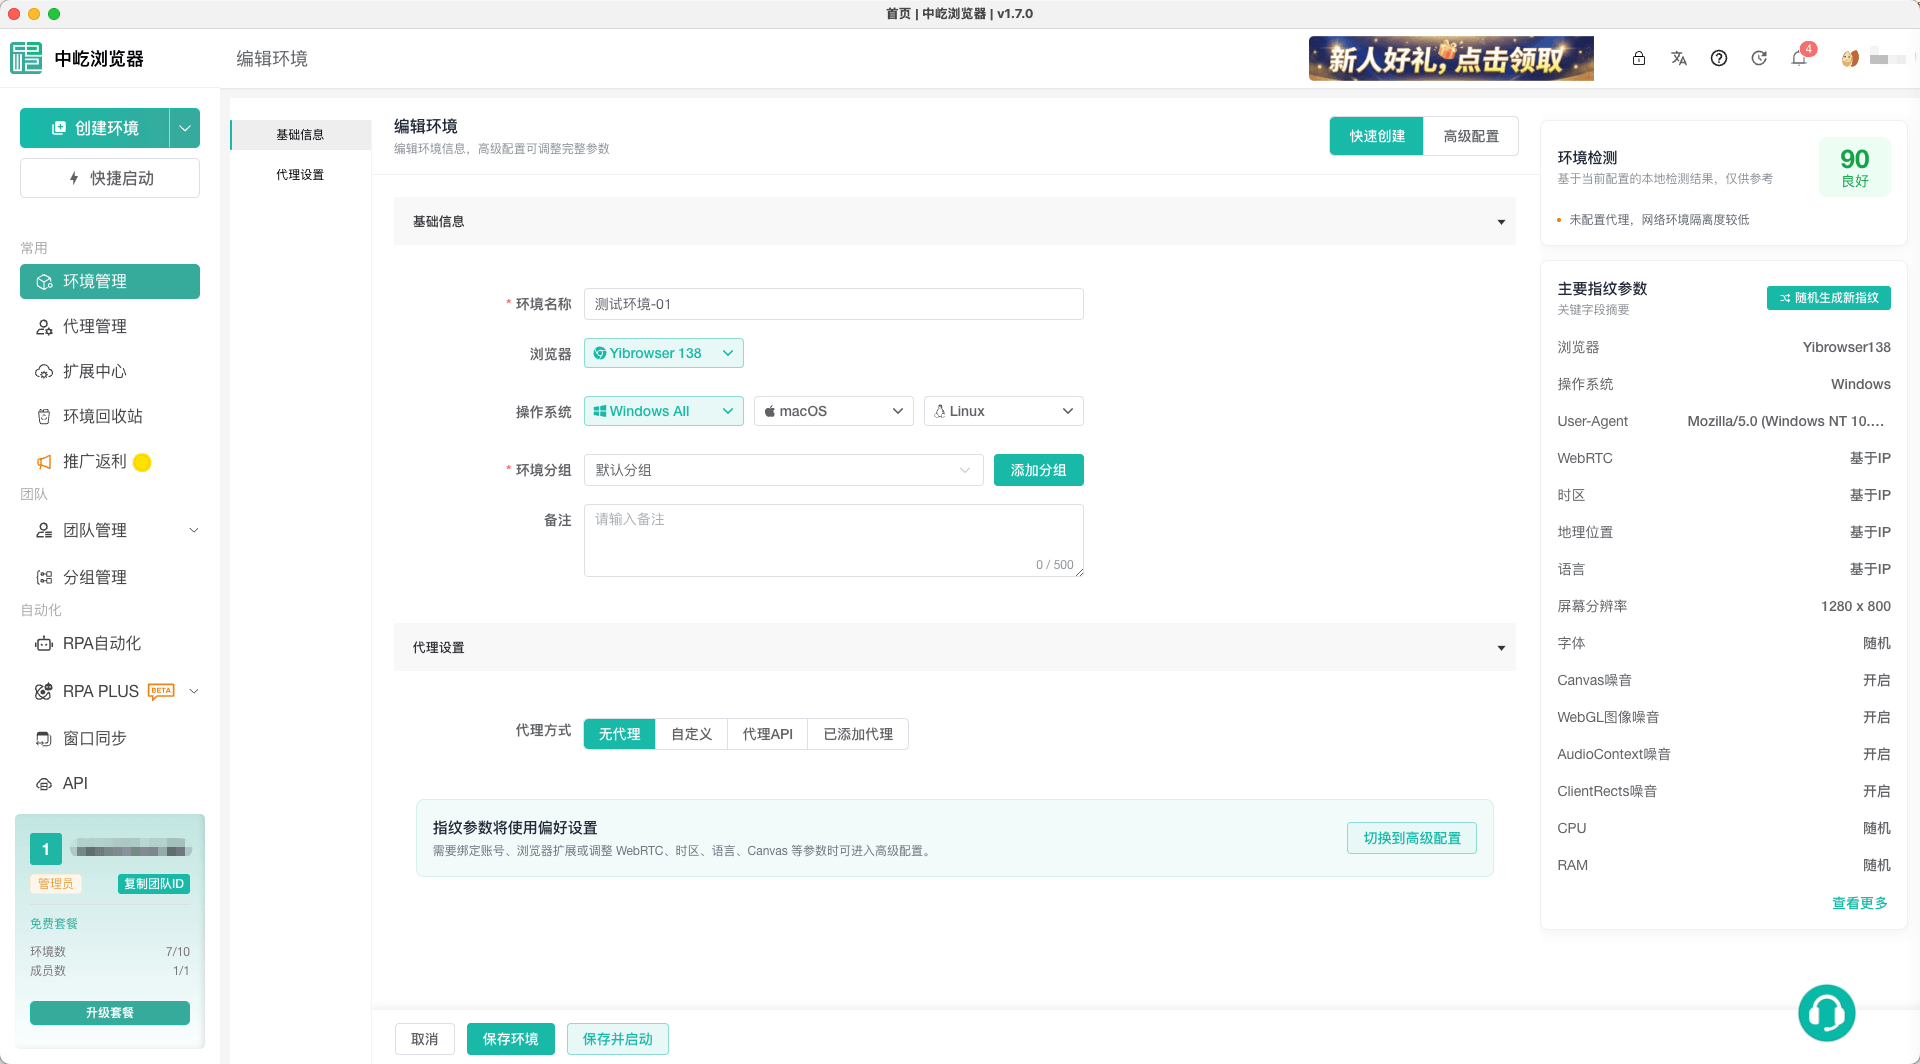
Edit an Existing Profile
- Find the profile in the list.
- Open its
Moremenu. - Click
Edit. - Update settings in Quick or Advanced mode.
- Select
Save ProfileorSave and Launch.
If the profile is already open, the second action changes to Save and Restart. The client closes the old window and relaunches it with the latest configuration. Save-and-launch or restart is unavailable while the profile is running an RPA task. Wait for the task to finish or stop it under Task Management and Scheduling.
TIP
ZYBrowser remembers the edit mode used for your last successful submission and selects the same mode the next time you edit a profile.
Next Steps
- Configure Fingerprints and Common Settings: Understand each group of Advanced Configuration settings.
- Create Browser Profiles in Bulk: Create multiple profiles with similar settings at once.
- Launch and Maintain Browser Profiles: Launch and maintain the new profile.