Use the Workflow Editor
The workflow editor organizes nodes into an executable workflow. Nodes perform operations, connections determine execution order, and Workflow Settings control shared canvas and runtime behavior.
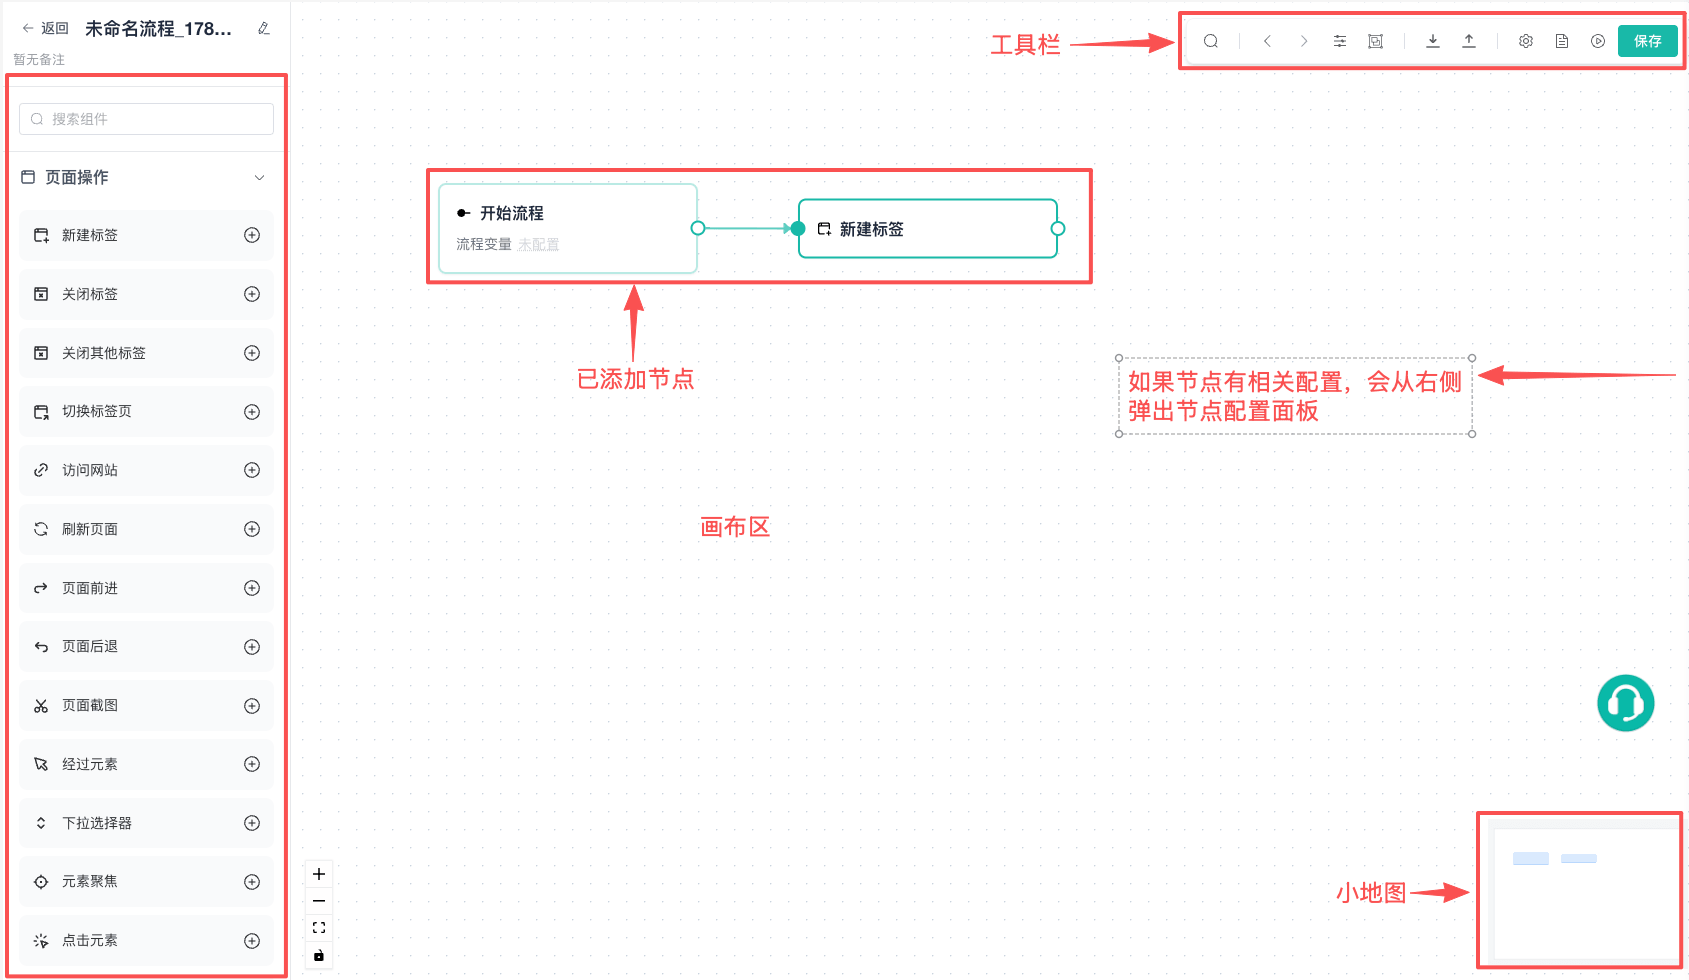
Editor Areas
| Area | Purpose |
|---|---|
| Node library | Find nodes by category or search by name |
| Canvas | Place nodes, connect them, and adjust workflow structure |
| Node configuration | Edit parameters, variables, notes, and outputs for the active node |
| Toolbar | Search canvas nodes, undo, arrange, import, debug, and save |
| Minimap | View the complete workflow and move quickly to another canvas area |
Add Nodes
Every workflow contains a Start node for global variables. It cannot be deleted.
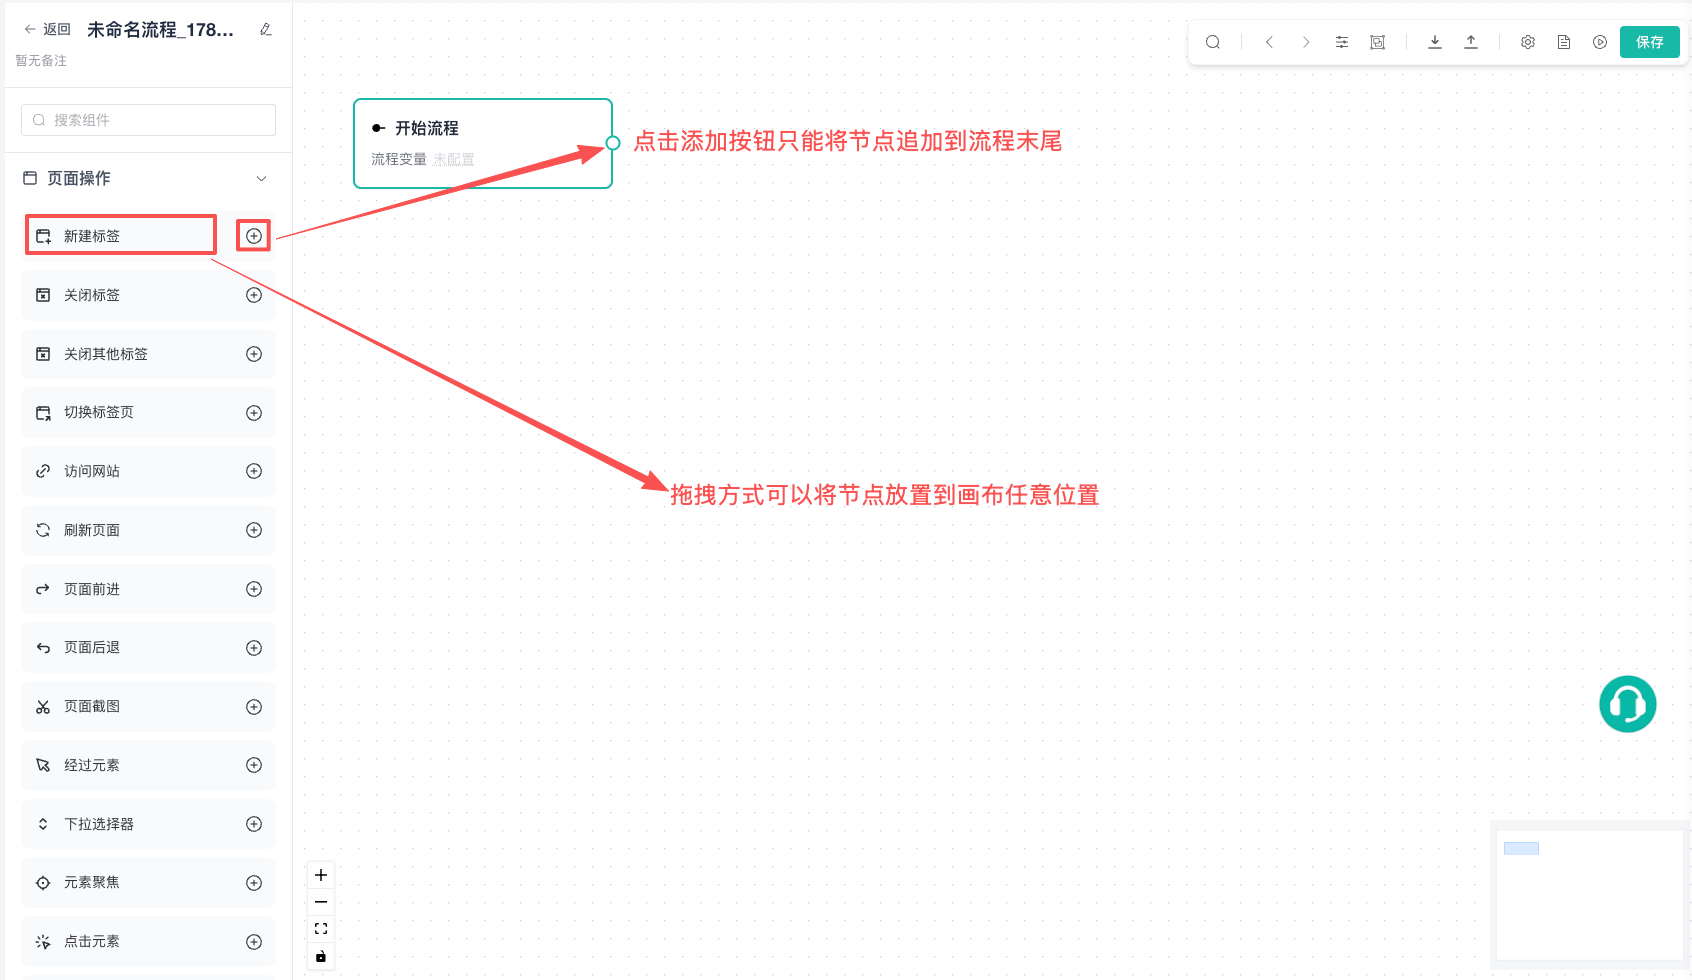
Add other nodes in either way:
- Drag: Drag a node from the library to a specific canvas position.
- Append: Click the plus icon beside a node to append it to the current main flow.
Search the node library by name. Try terms such as "click," "Excel," or "loop" to narrow the list.
Configure a Node
Select a node and enter its parameters in the configuration panel. Fields depend on the node type and commonly include:
- Input values or variable-enabled text.
- Element selectors or saved element objects.
- Timeout and wait behavior.
- Output variable name.
- Notes or description.
Complete every required field. An output variable must be a valid JavaScript identifier and is available only to downstream nodes from its source node onward.
For node fields, see Page Action Nodes, Keyboard and Wait Nodes, Data Collection and Storage Nodes, Data Processing Nodes, and Flow Control Nodes.
Connect Nodes
Drag from an upstream output port to a downstream input port. After connecting:
- Each standard output can retain at most one connection.
- A new connection from the same output replaces the previous one.
- Double-click a connection to delete it.
- Drag an endpoint to reconnect an existing connection.
- Node positions affect layout only; connections determine execution order.
Auto-connect is enabled for new workflows. When a node approaches a compatible position, the editor creates or adjusts a connection according to the detection distance. The default is 150 pixels and can be changed or disabled in Workflow Settings.
Navigate the Canvas
The canvas supports:
- Dragging an empty area to pan.
- Zooming the workflow view.
- Fit View to display the complete workflow.
- Panning and zooming through the minimap.
- Auto Layout to rearrange nodes in the active layout direction.
For a large workflow, apply Auto Layout first and then fine-tune important branches.
Use the Toolbar

| No. | Feature | Description |
|---|---|---|
| 1 | Search | Highlights canvas nodes with matching names; press Enter for the next result |
| 2 | Undo | Reverts the most recent edit |
| 3 | Redo | Restores the most recently undone edit |
| 4 | Auto Layout | Rearranges nodes using the horizontal or vertical setting |
| 5 | Group | Places an eligible sequence of nodes in one group |
| 6 | Import Workflow | Replaces the canvas with JSON; the imported result must still be saved manually |
| 7 | Export Workflow | Exports canvas JSON for the active workflow |
| 8 | Workflow Settings | Changes layout, Auto-connect, error handling, and runtime options |
| 9 | Debug Logs | Opens logs for the active or most recent debug run |
| 10 | Debug / Stop | Runs the active workflow or requests that debugging stop |
| 11 | Save | Validates and saves, then returns to the workflow list |
The editor retains up to 100 history snapshots. Afterward, the oldest edits are discarded.
Keyboard Shortcuts
| Shortcut | Action |
|---|---|
Ctrl/Cmd + S | Saves and remains in the editor |
Ctrl/Cmd + C | Copies one or more selected nodes |
Ctrl/Cmd + V | Pastes copied nodes |
When several nodes are copied, connections internal to the selected subgraph are copied as well. External connections to unselected nodes are not.
When the cursor is in a standard input, text area, or JavaScript editor, the workflow editor does not intercept copy and paste shortcuts.
Node Quick Actions
The floating toolbar for a standard node provides:
- Debug from this node.
- Copy node.
- Delete node.
- Configure error handling.
- Enable or disable node.
IF and structured loop nodes cannot be disabled. Close Profile is a terminal node that closes the active browser profile and ends the current execution path.
Debug from the Current Node
Node debugging validates only the selected node and its reachable downstream path:
- Standard nodes before it do not run, so their output variables are unavailable.
- Global variables from Start are still injected.
- If it depends on an upstream output, start debugging from an earlier node or prepare a suitable global variable for the test.
Error Handling
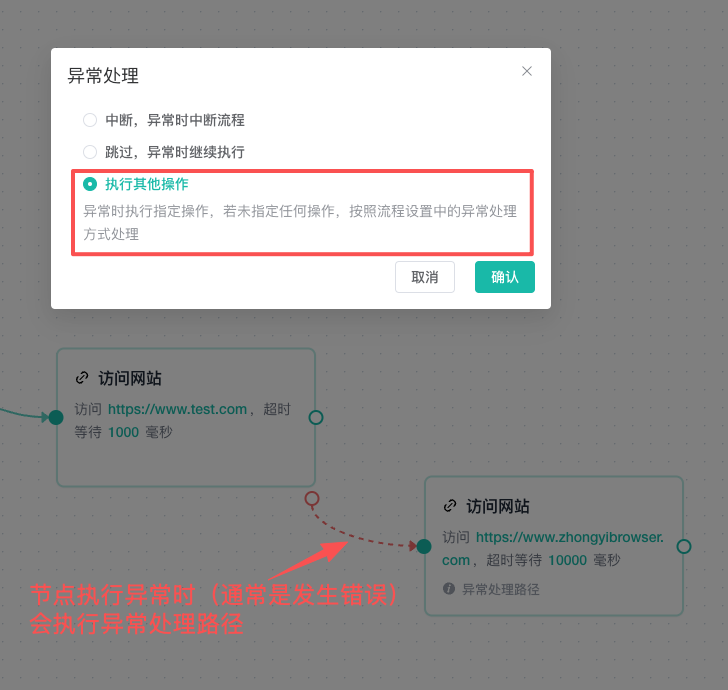
A node can Stop Workflow, Skip Current Node, or Run Alternative Actions on error.
Only Run Alternative Actions displays a red error output. Each error output supports one connection, and an error connection does not consume a standard input limit.
| Strategy | Behavior | Suitable use |
|---|---|---|
| Stop Workflow | Stops the current execution path | Critical login or pre-payment validation that cannot be skipped |
| Skip Current Node | Records the error and continues downstream | Noncritical screenshot or optional field extraction |
| Run Alternative Actions | Enters an error branch that can rejoin a downstream node on the normal path after recovery | Record failure, switch to a fallback page and continue, or close the profile safely |
Rejoin the Normal Path from an Error Branch
After recovery actions, an error branch can connect to a downstream node on the normal path so both paths share the remaining operations.
- Set the node that needs error handling to Run Alternative Actions to display its red error output.
- Connect the red error output to a recovery node, then connect any additional recovery actions in sequence.
- Connect the output of the last node in the error branch to the input of the downstream node where execution should continue. Keep that node's existing normal-path connection.
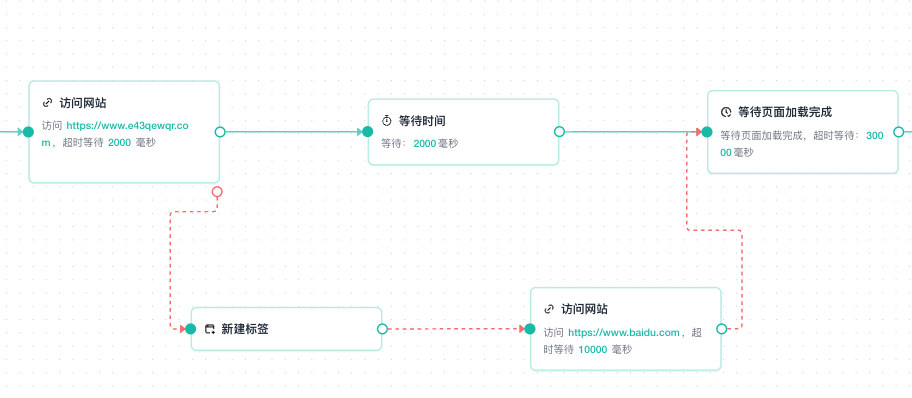
For example, if the first Access Website node fails, run New Tab, access a fallback URL, and then rejoin the normal path at Wait for Page Load.
| Path | Connections shown | Execution order |
|---|---|---|
| Normal path | Green solid lines above | Access the original URL successfully → Wait → Wait for Page Load → Downstream nodes |
| Error path | Red dashed lines below | Fail to access the original URL → New Tab → Access the fallback URL → Wait for Page Load → Downstream nodes |
The rejoin point determines where execution continues after recovery. In this example, the error path connects directly to Wait for Page Load, so it does not pass through the Wait node on the normal path.
Group Nodes and Child Nodes
The following rules apply only to group nodes and their child nodes:
- Skip on child node error: Skips the failed child node and continues with the next node inside the group.
- Stop on child node error: Stops the remaining nodes inside the group, then follows the group node's error handling configuration to skip the group, stop the current execution path, or enter the group's error branch.
A child node cannot have an independent error branch. To use an error branch, configure Run Alternative Actions on the group node.
To apply the same error handling strategy to all child nodes in the current group, use Child Node Error Settings (Batch) in the group toolbar. Confirming overwrites each child node's existing setting while leaving the group's own error handling configuration unchanged. See Configure Child Node Error Handling in Bulk for the steps.
Condition and Loop Connections
IF Condition
An IF node must connect both True and False; it has no default standard output. Branches can merge later when structurally valid, including nested IF merges.
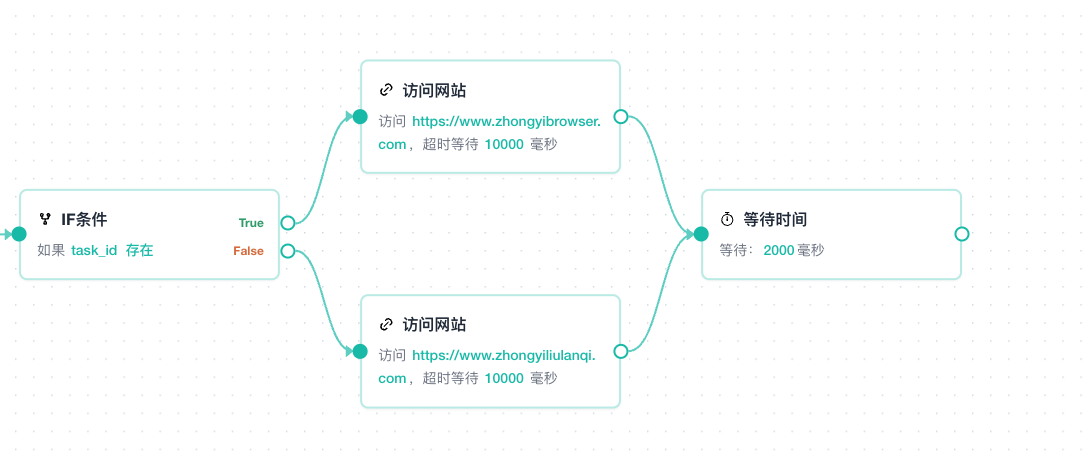
Structured Loops
For Each Element, Repeat N Times, For Each Data Item, and While use the same ports:
Loop Start: Enters the loop body.Loop End: Returns from the body to the loop node; at least one back edge is required.- Default output: Continues after the loop and can remain unconnected.
The main input and Loop Start each allow one connection. If the body contains branches, several branch edges can return to Loop End.
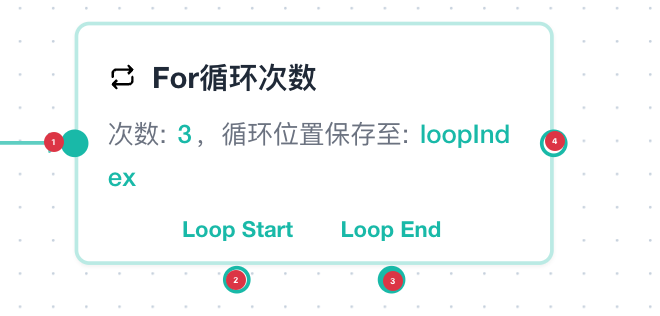
| No. | Loop port | Description |
|---|---|---|
| 1 | Main input | Enters the loop from an upstream node |
| 2 | Loop Start | Starts an iteration and enters the body |
| 3 | Loop End | Returns after the body completes |
| 4 | Default output | Continues the main workflow after the loop finishes |
Use Groups
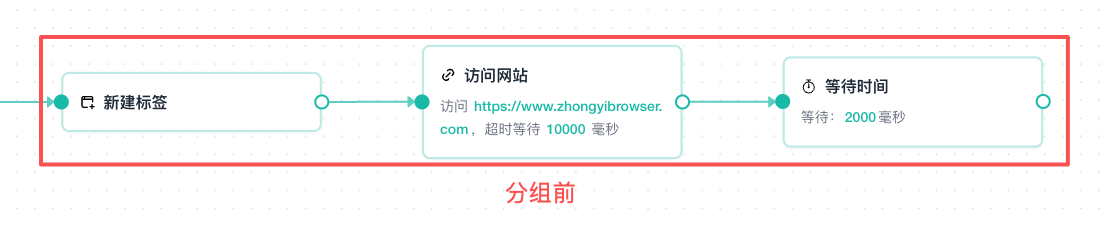
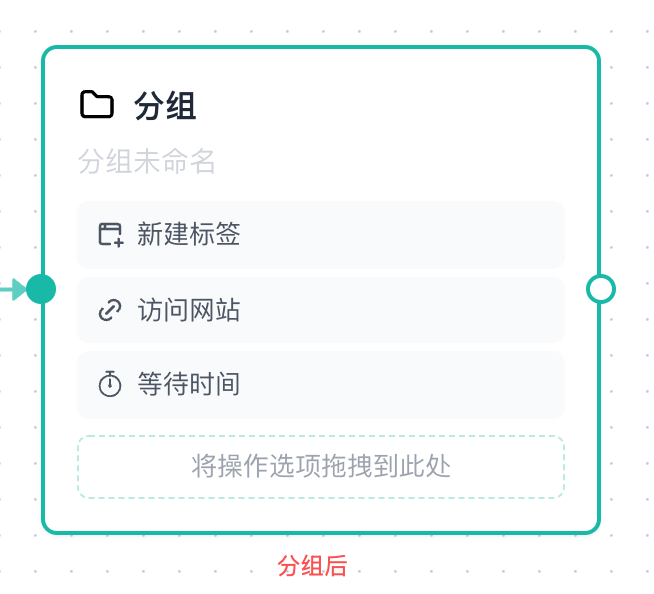
Groups contain a linear sequence of standard operations that execute in order.
Create a Group Manually
Drag standard nodes into a group. Inside it, you can:
- Change node order.
- Edit or delete nodes.
- Set child nodes to stop or skip on error, individually or in bulk.
- Drag nodes back to the top-level canvas.
- Ungroup the complete group.
Start, another group, IF, structured loops, and Break Loop cannot be placed in a group.
Dragging a Node into a Group Changes Connections
Dragging a top-level node directly into a group deletes its existing connections. The editor does not reconnect its original predecessor and successor automatically. Review the main flow after grouping.
Group Automatically
Automatic grouping requires at least 3 consecutive, linear standard nodes. It is unavailable when:
- A node has a custom error branch.
- A node is inside a standard branch.
- A node contains a loop back edge.
- Connections skip across the sequence.
When no nodes are selected, Group attempts to find the longest eligible sequence on the canvas.
Save and Leave
The toolbar Save action validates node fields and workflow graph structure. A successful save returns to the list. Ctrl/Cmd + S saves and remains in the editor.
When unsaved changes exist, leaving provides:
- Save: Save changes and leave.
- Discard: Abandon the changes and leave.
- Cancel: Remain in the editor.
Resolve Validation Errors
Saving, importing, and debugging validate the workflow. The editor highlights and focuses the relevant node and displays the reason.
Common structural errors include:
- Start is missing or a node is outside an executable path.
- IF lacks a
TrueorFalsebranch. - A loop lacks
Loop Startor a back edge toLoop End. - A standard node has multiple invalid inputs.
- Close Profile has a standard outgoing connection.
- A required node field is empty or an output variable name is invalid.
Fix the first highlighted error and validate again. One structural fault can cause several later messages, so following execution order is usually faster.
Next Steps
- Element Location and Selectors: Configure nodes that operate on page elements.
- Variables and Data: Understand output variables and scope.
- Workflow Settings: Adjust editing and runtime options.
- Flow Control Nodes: Configure IF, loops, and Close Profile.
- Debug Automation Workflows: Select a profile and review structured logs.