Configure Local Client Settings
Local Settings primarily stores client configuration specific to the current device. System startup, close behavior, zoom, memory limits, cache directory, and system logs appear only in the desktop client. RPA task settings also apply to local task execution.
Common Settings and RPA Tasks
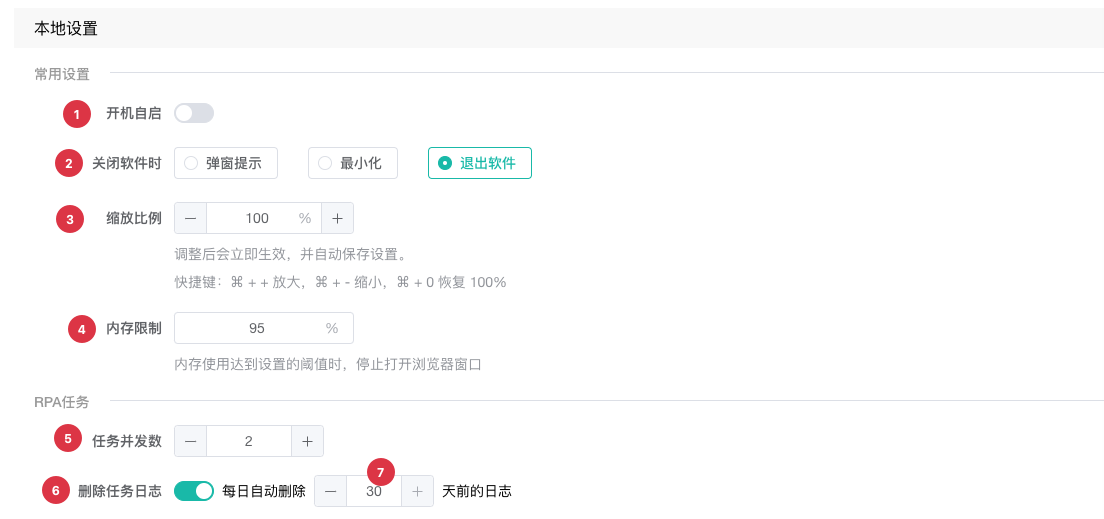
| No. | Feature | Description |
|---|---|---|
1 | Launch at startup | Controls whether the application starts with the operating system; uses the current operating system's startup capability |
2 | When closing the application | Select Ask, Minimize, or Quit to determine what closing the main window does |
3 | Zoom | Sets the client main window's zoom percentage from 50 to 200; changes apply immediately and are saved automatically. Use Ctrl/⌘ + + to zoom in, Ctrl/⌘ + - to zoom out, or Ctrl/⌘ + 0 to reset to 100% |
4 | Memory limit | Stops opening new browser windows when system memory usage reaches the threshold; accepts an integer from 1 to 100 percent |
5 | Concurrent tasks | Maximum number of legacy RPA and RPA tasks that can run on the current device |
6 | Automatically delete task logs | Removes RPA task logs older than the retention period each day |
7 | Log retention | Available when automatic deletion is enabled; accepts 1-30 days |
Choose task concurrency based on CPU, memory, and target page load. Excessive concurrency can cause profile launch failures, slow page responses, or resource contention between tasks.
Browser Cache and System Logs

| No. | Feature | Description |
|---|---|---|
1 | Cache directory | Displays the root directory for browser profile cache on the current device |
2 | View | Opens the folder containing the current cache files |
3 | Change | Selects a new directory after a migration warning; existing cache files are not moved automatically |
4 | Automatically delete cache | Enter 1-30 days to remove cache for profiles not used within that period; leave empty to disable |
5 | Scan and Delete Now | Scans for eligible cache and displays the count and estimated space before confirmation |
6 | Scan and confirmation | Displays scan failures, running profiles that will be skipped, and estimated space; confirmed deletion cannot be undone |
7 | System Logs | Opens the client system log directory for troubleshooting |
Change the Cache Directory
- Click
Changeand read the migration instructions. - Confirm that you understand, open the current directory, and select a new path.
- Move existing cache files to the new directory manually.
- Return to the client and click
Save Settings.
You cannot run Scan and Delete Now while a cache directory change is unsaved. Running profiles are skipped during cleanup. Confirm that the remaining profile cache is no longer needed before deleting it.
WARNING
Cache deletion cannot be undone. Do not use Scan and Delete Now for profiles that still require local data or login sessions, and do not omit the manual migration step when changing directories.