Create an Automation Workflow
This guide creates a simple RPA workflow that opens a webpage, waits for it to load, and finishes. Replace the example URL with a real business page and extend the workflow with clicks, input, or data extraction.
After completing this guide, you will be able to:
- Create a workflow from Workflow Management.
- Add and configure nodes and connect their execution order.
- Configure workflow-level error handling and browser behavior.
- Save the workflow and debug it with a browser profile.
Before You Begin
Confirm that:
- The ZYBrowser desktop client is installed and you are signed in.
- At least one browser profile exists, as described in Create and Edit a Browser Profile, for debugging.
- You have a reachable test URL, such as
https://www.zhongyibrowser.com. - A suitable browser profile is available. Debugging attempts to connect to an already running profile first and prepares a new runtime only when it cannot reuse the connection.
Create a Workflow
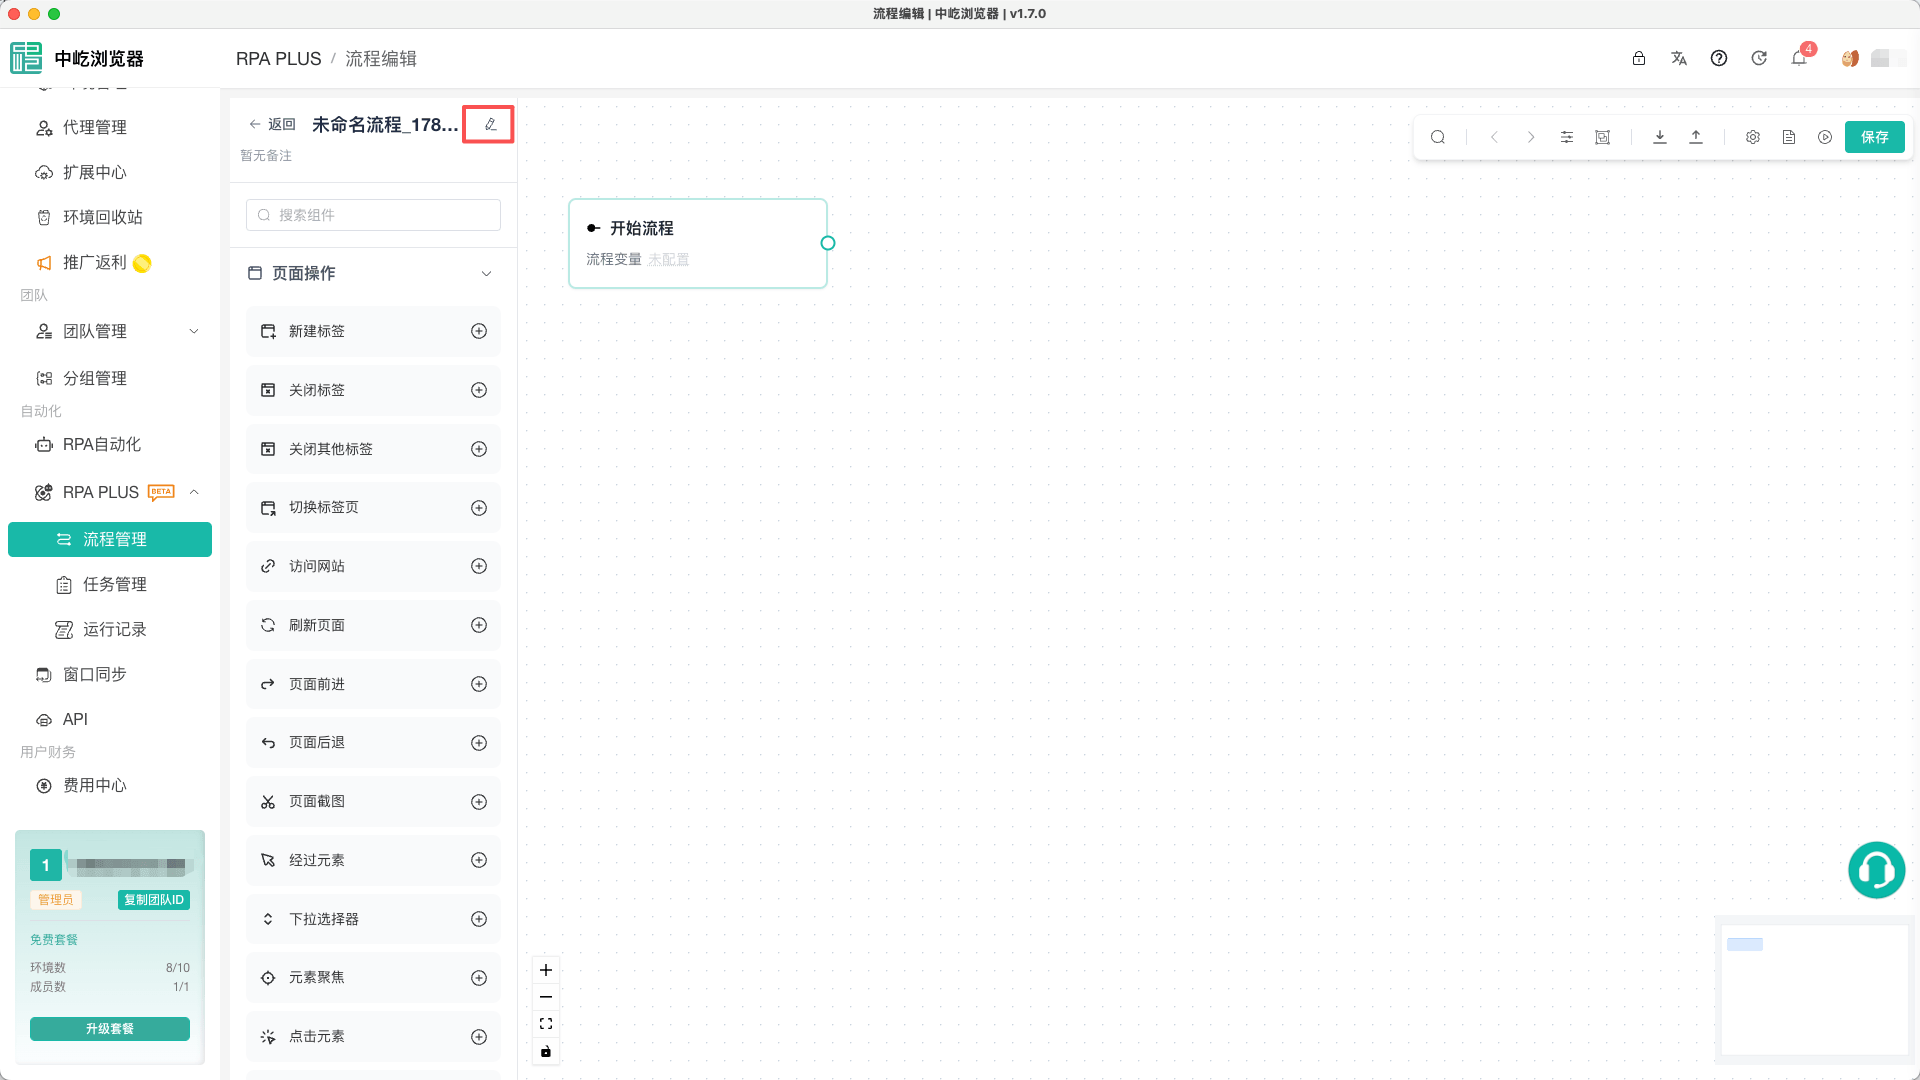
- Expand RPA in the client sidebar and open Workflow Management.
- Click Create Workflow at the top.
- In the workflow information area on the left side of the editor, click the edit icon.
- Enter a Workflow Name, such as
Open Example Website, and optionally describe its purpose in Notes. - Click Confirm.
The workflow name is required and can contain up to 100 characters. Notes can contain up to 200 characters. The editor automatically adds a Start node that cannot be deleted and serves as the fixed entry for every workflow.
Add the First Action
Add an Access Website Node
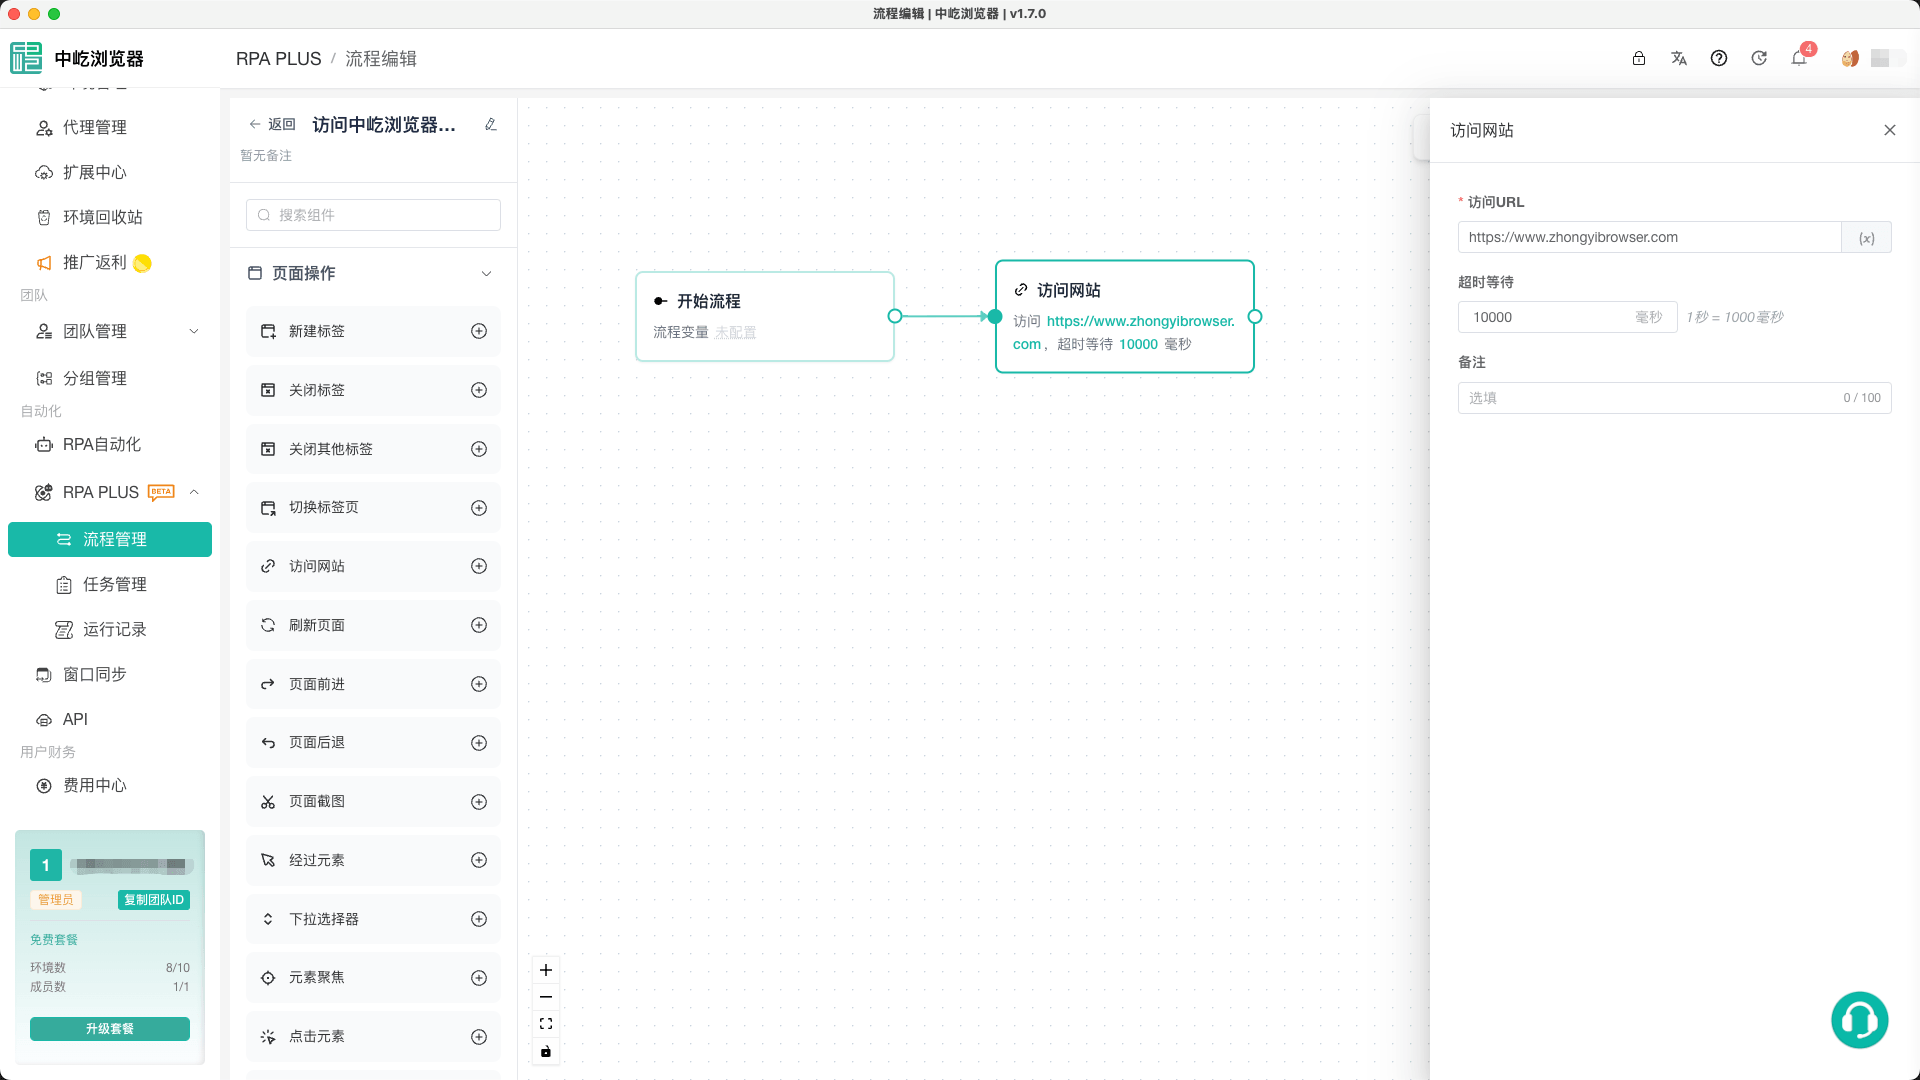
Expand Page Actions in the node library on the left.
Find Access Website and click its plus icon to add it to the canvas.
You can also drag the node card onto the canvas. The plus icon attempts to append it to the end of the current main flow and connect it automatically. Releasing a dragged node close to an existing node may also create a connection.
The node configuration panel opens on the right.
Enter
https://www.zhongyibrowser.comunder URL. Include thehttps://orhttp://scheme and adjust Timeout if required.Close the panel or select another node. Closing the panel writes the configuration back to the node.
Add a Wait Node
Add a wait after opening the website so the page has time to load:
- Expand Wait Actions in the node library.
- Add Wait for Duration after Access Website.
- Enter a duration such as
1000milliseconds (1 second = 1000 milliseconds).
If you drag the node, place it in the intended position and then check the arrow direction. An arrow represents execution order: the downstream node starts only after the upstream node finishes.
Configure Nodes and Variables
Fields in the configuration panel depend on the node type. Every required field must be completed, or saving and debugging report a configuration error.
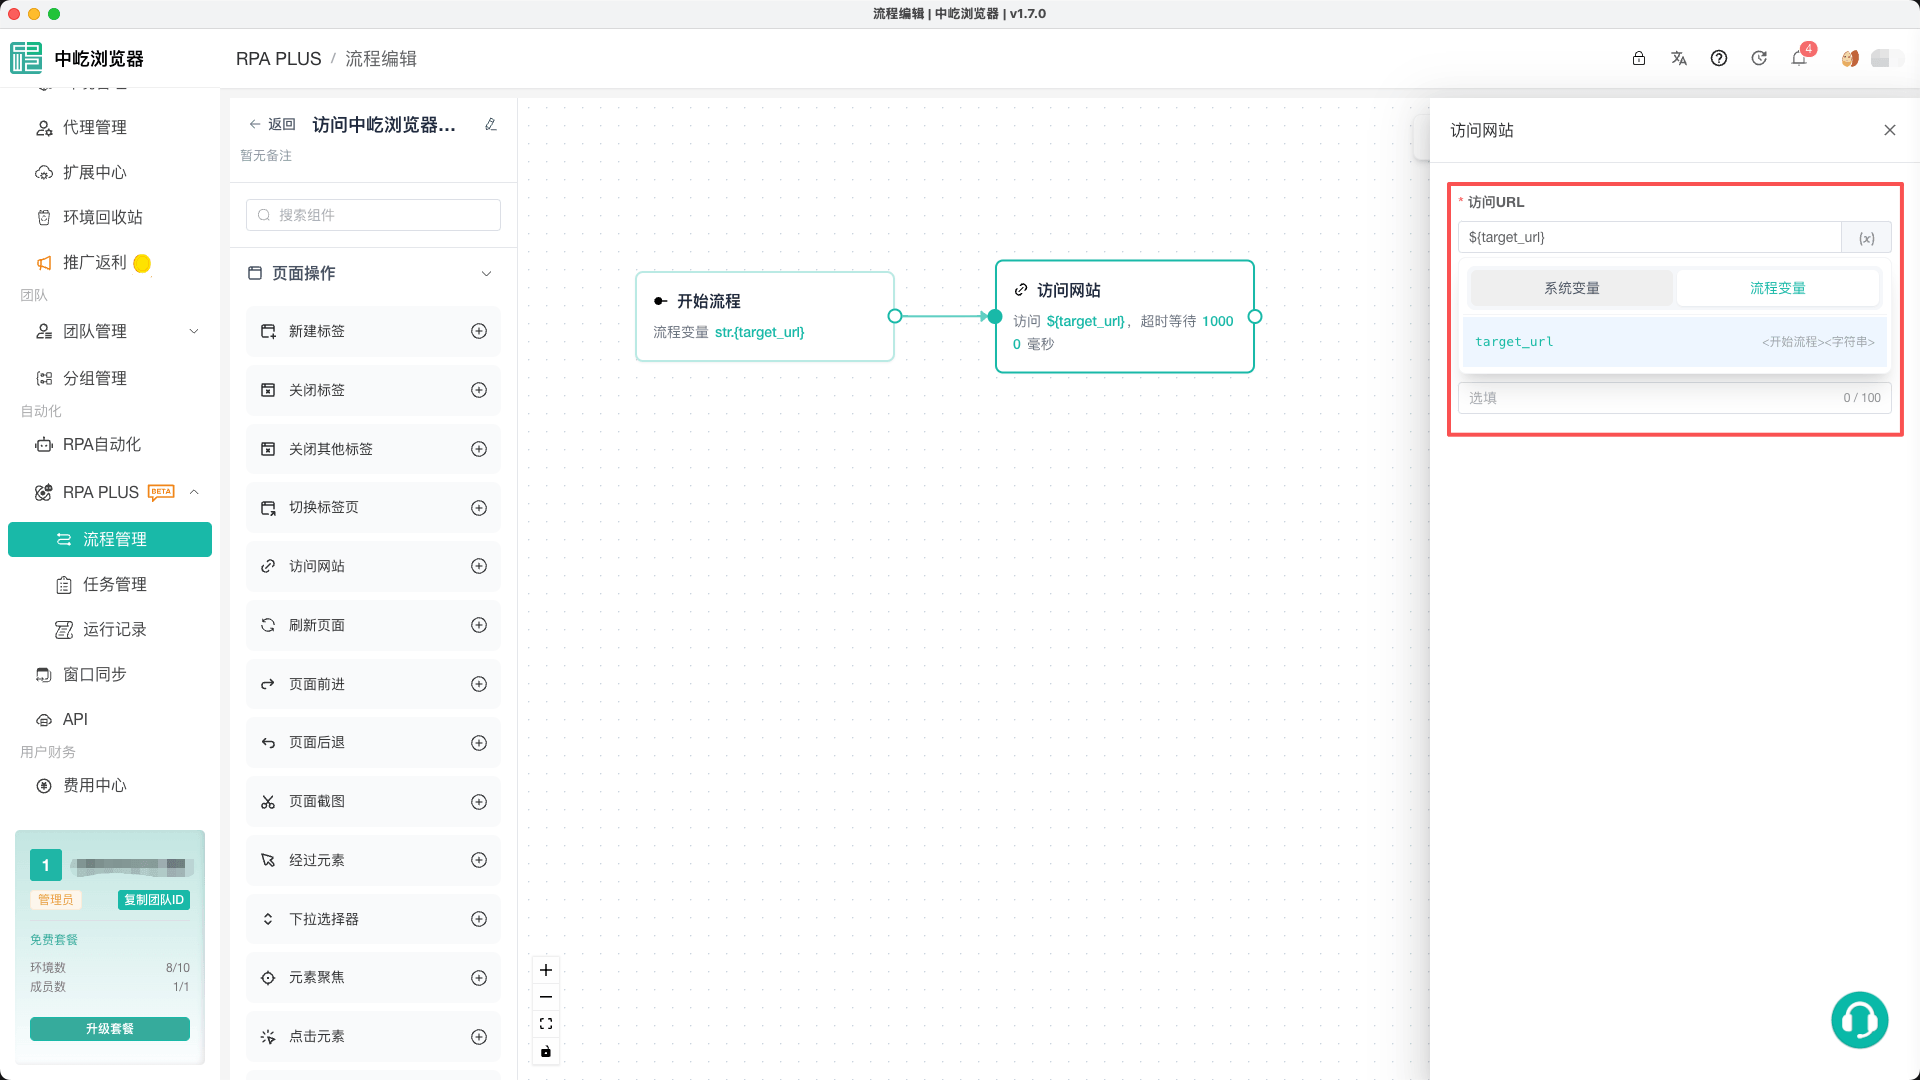
For data reused across nodes, create a workflow variable in Start:
- Select the
Startnode on the canvas. - Click Add Variable in the panel on the right.
- Enter a name, type, default value, and notes.
- Save the node configuration.
- Use the variable picker in downstream fields to reference it.
For example, create a string variable named target_url with the default https://www.zhongyibrowser.com, then select it in the URL field of Access Website. You can then change the destination by updating one variable.
TIP
An output variable is available only to nodes after its source node that can be reached along workflow connections. Never reference it before the node that produces it.
Review and Adjust Connections
Every workflow retains at least the Start node and must connect it to the actions that should run. On the canvas, confirm that:
- Every node that should execute is on a path from
Start. - Connection directions are correct and do not route back to an earlier step unintentionally.
- Entry and exit ports for branches, loops, and groups are connected correctly.
- No required connection is missing; an isolated node is not executed by the main workflow.
Drag a connection endpoint to reconnect it, or use Auto Layout on the toolbar to organize the canvas. Node positions affect only layout; connections determine execution order.
Configure Workflow Options
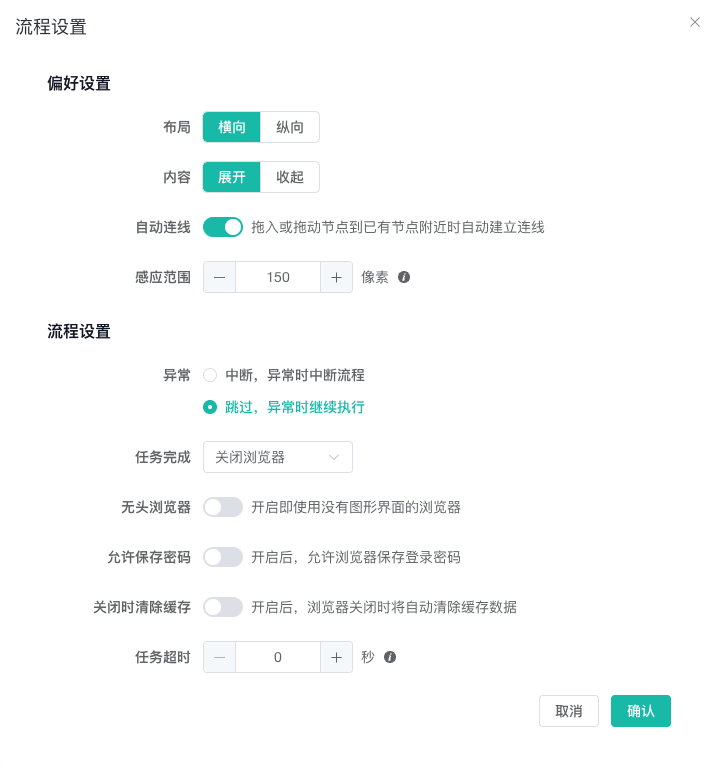
Click the settings icon in the upper-right toolbar to open Workflow Settings.
| Setting | Purpose |
|---|---|
| Layout | Arrange the canvas Horizontally or Vertically |
| Content | Display group or structured node content Expanded or Collapsed by default |
| Auto-connect | Creates connections when nodes are dragged onto or near existing nodes; when enabled, the detection range can be adjusted |
| On Error | Stop the workflow or Skip the failing node and continue. An individual node setting overrides the workflow default |
| When Complete | Close Browser or Keep Open after execution |
| Headless Browser | Runs without a graphical window. Keep disabled while debugging page interactions |
| Task Timeout | Maximum workflow duration in seconds; 0 disables the timeout |
| Delayed Start | Number of minutes to wait before execution |
| Launch Arguments | Additional browser arguments, such as --disable-notifications |
Click Confirm in the dialog and then Save on the toolbar to write both settings and canvas content to the workflow.
Save the Workflow
After configuring and connecting nodes, click Save on the right side of the toolbar.
ZYBrowser checks workflow structure and required node fields. A successful save displays a confirmation and returns to Workflow Management. The first save generates a Workflow ID, and you can reopen the workflow later.
The Save action also supports shortcuts:
- Click Save: Save and return to the list.
- Press
⌘+Son macOS orCtrl+Son Windows: Save without returning.
If you leave or switch pages with unsaved changes, a confirmation appears. Save first to retain changes, or discard them to return without saving.
Debug the Workflow
Debug the current workflow directly in the editor after saving:
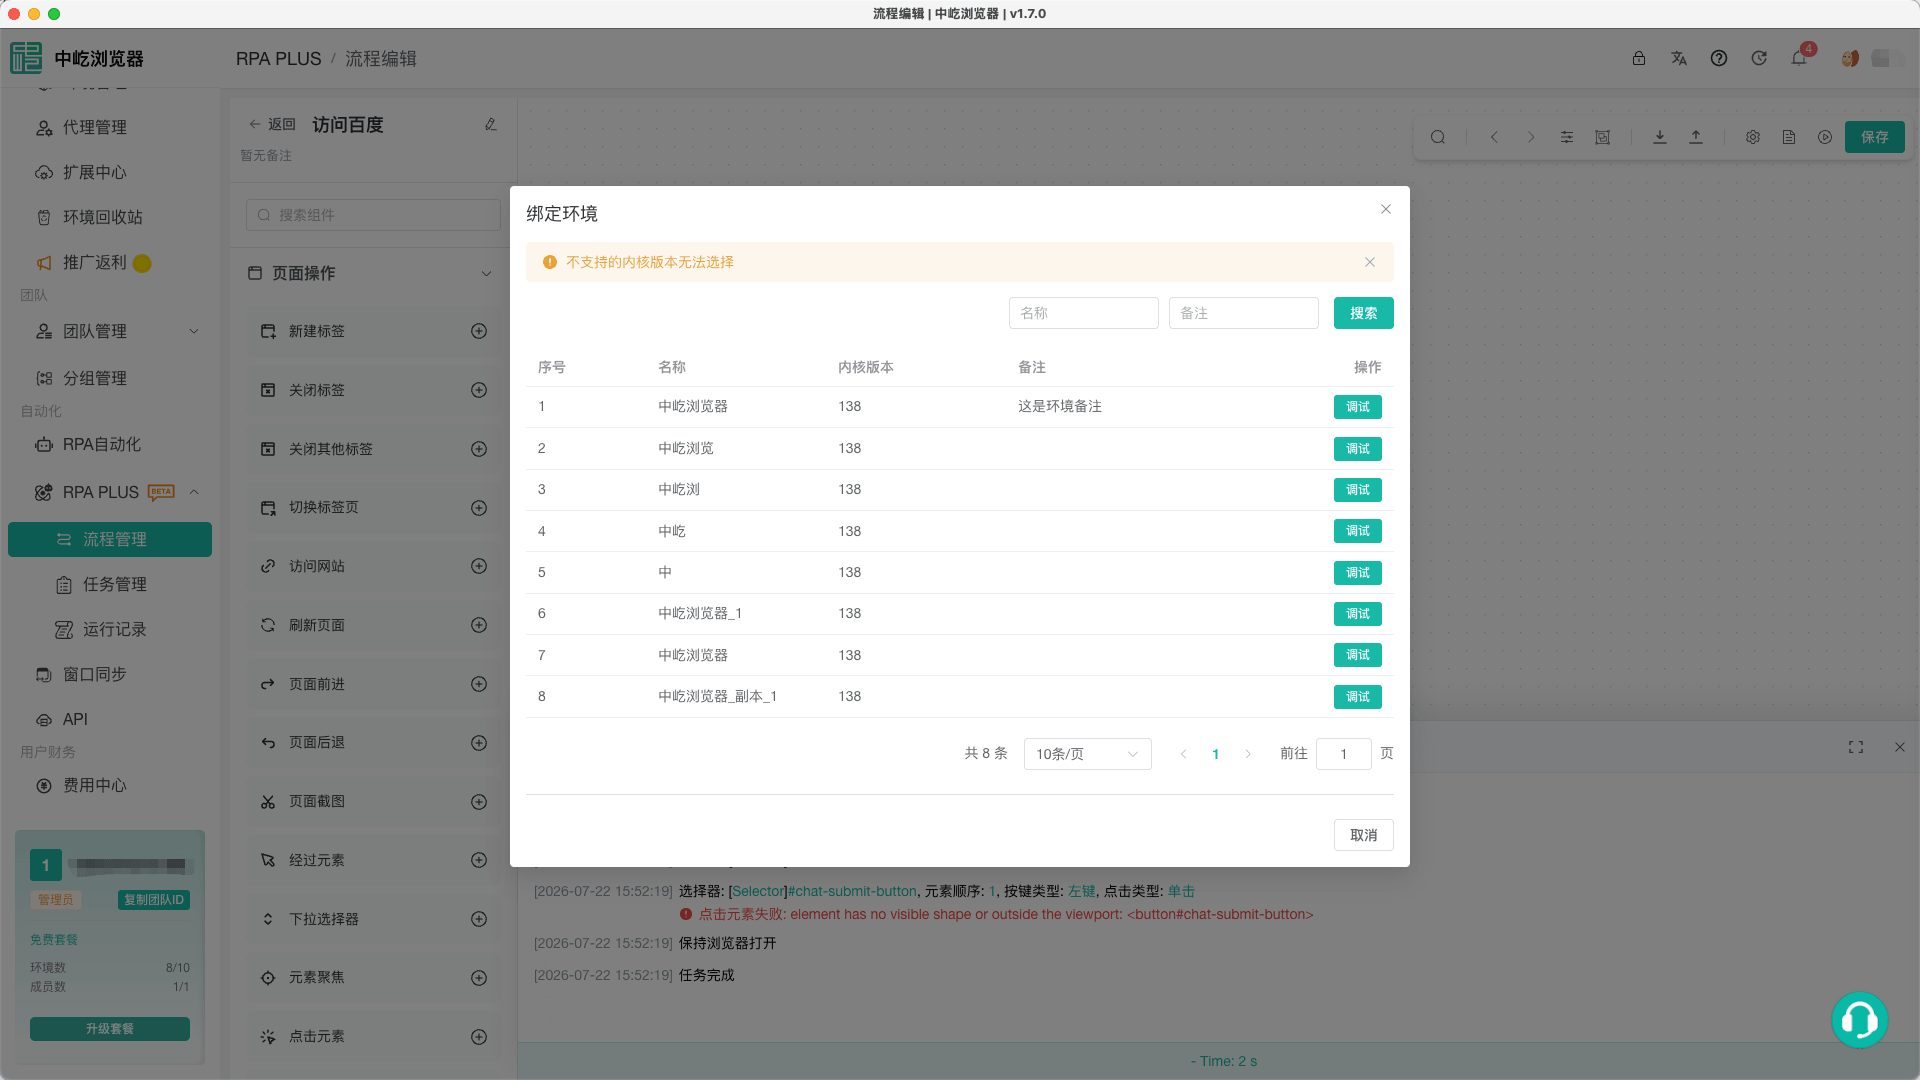
- Click the Debug play icon on the toolbar.
- If no debug profile is selected, search by name, notes, or profile row number.
- Confirm that the engine version meets the requirement and click Debug in that row.
- Follow execution and review each node under Debug Logs.
The profile must be available. Profiles with an engine version below 118 or unsupported by the current platform are disabled. If the profile is already running, RPA attempts to reuse the existing connection.
During execution, Debug changes to a Stop icon. When the workflow ends, open the log to review order and exceptions. Correct an invalid node, save again, and rerun debugging.
Troubleshooting
Node Configuration Error During Save
Open the node named in the message and review required fields. Common causes include an empty URL, missing element selector, duplicate variable name, or invalid JSON in an array or object. Correct the field, close the panel, and click Save again.
No Profile Can Be Selected for Debugging
Check whether the engine version is below 118 and whether the current platform supplies that engine. If an existing connection cannot be reused, select another supported profile and retry.
An Added Node Does Not Run
Confirm that the node is reachable from Start through correctly directed connections. An isolated node, or one placed on the canvas without a connection to the main workflow, does not run.
Unsaved Changes Appear When Returning to the List
This protects editor changes. Select Save First to keep them or Discard to abandon them and return.
Next Steps
- Core Concepts and Variable Types: Learn variable types, scope, and references.
- Use the Workflow Editor: Learn nodes, connections, search, groups, and Auto Layout.
- Workflow Settings: Review all workflow-level settings.
- Debug Automation Workflows: Understand debug logs and exception diagnosis.
- Task Management and Scheduling: Bind a validated workflow to profiles and schedule execution.