Launch and Maintain Browser Profiles
The Actions column displays launch, bring-to-front, close, and other actions based on whether a profile is running. Launching, window control, proxy testing, and local cache maintenance require the desktop client.
Launch a Profile
- Find the profile under
Browser Profiles. - Confirm that the Actions column does not report an unsupported engine or plan limit.
- Click
Launch. - Wait for the
Startingstate to finish. If an engine or extension must be downloaded, follow the inline progress. - When the browser window opens, sign in or continue your work on the target website.
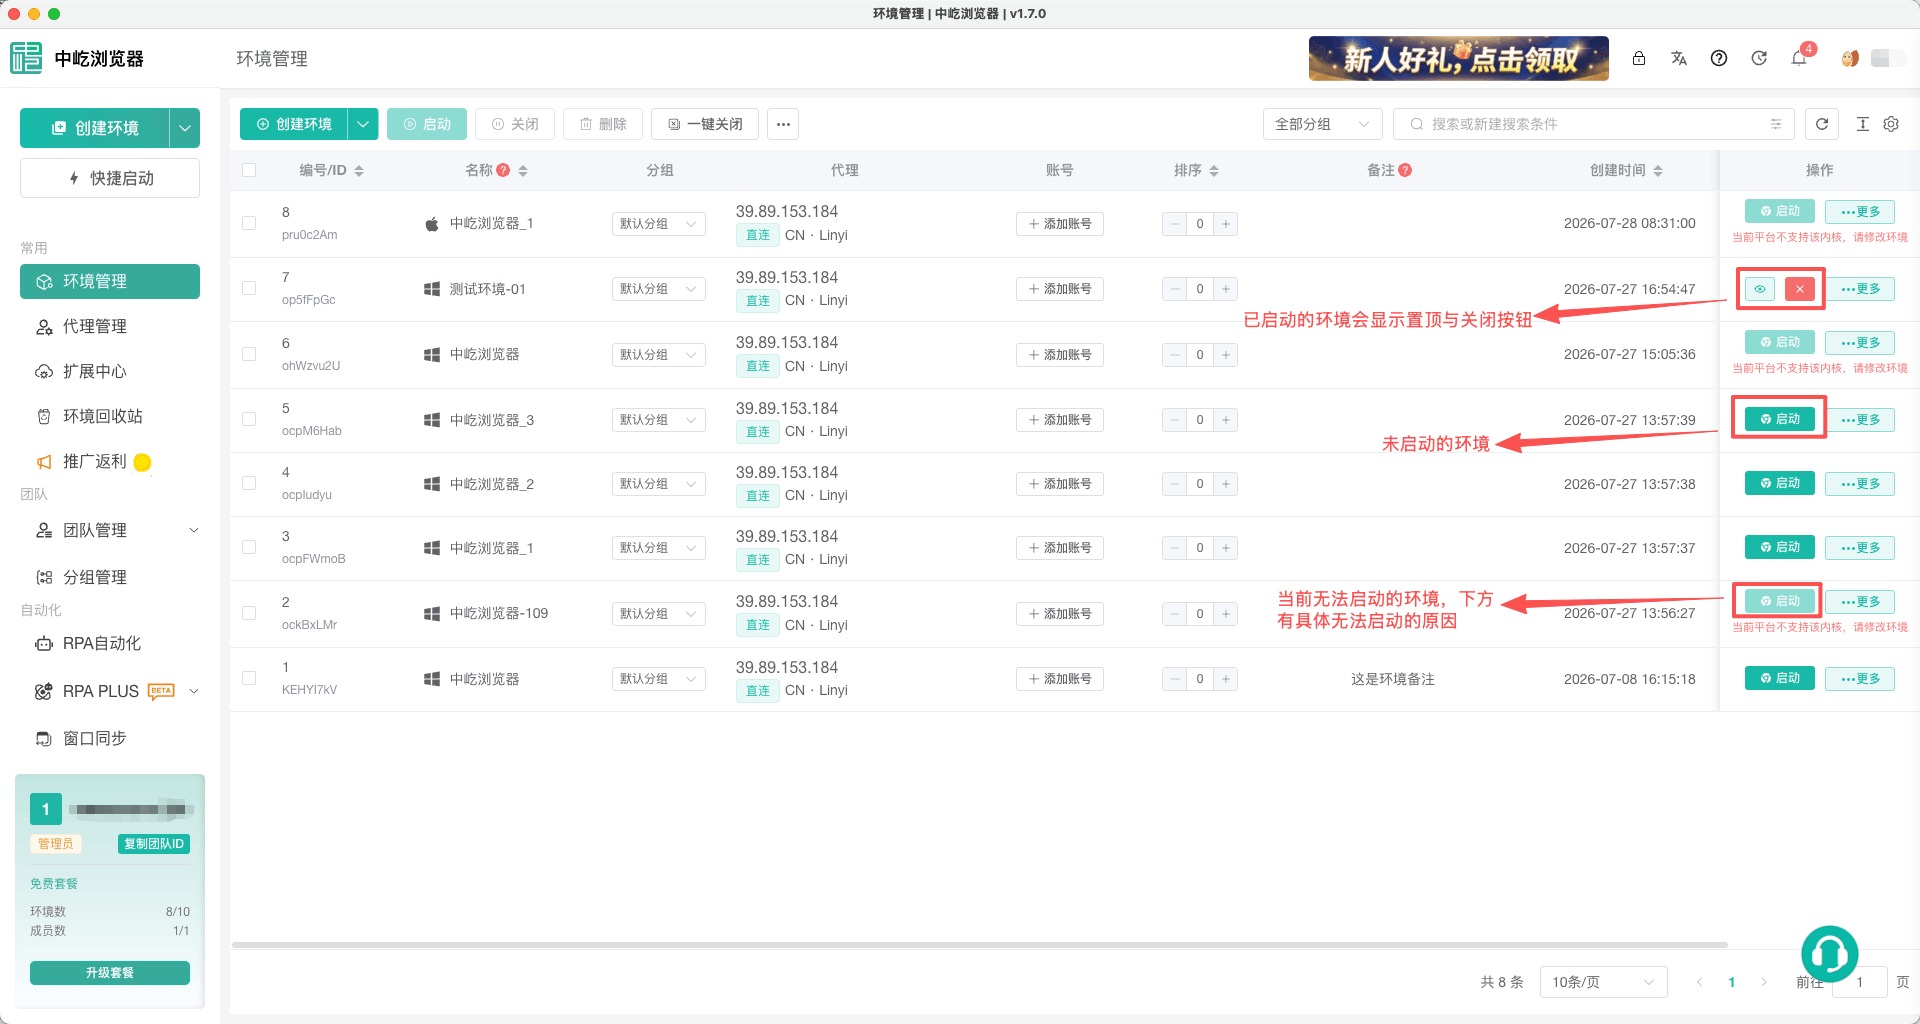
For a running profile, click the eye icon to bring its window to the front or the close icon to stop it. Save any unsubmitted website content before closing the window.
Use Quick Launch
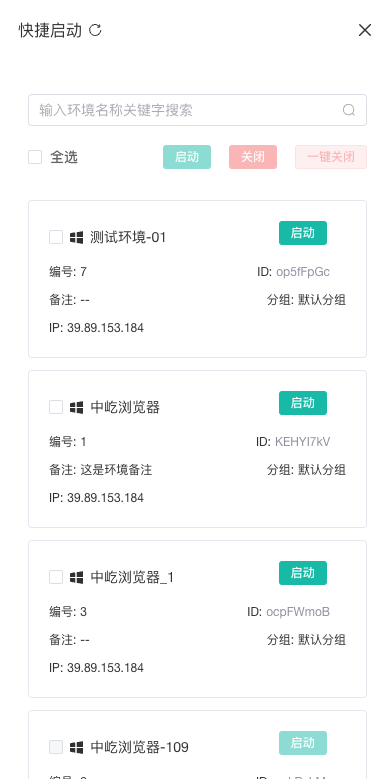
Quick Launch in the client sidebar provides a simplified profile list for finding and controlling profiles without opening the full management page. It displays the profile name, row number, ID, notes, group, IP, and other basic information. Enter part of a profile name in the search box to filter the list.
Control One Profile
A stopped profile displays Launch. After it starts, its card provides these actions:
| Action | Purpose | Considerations |
|---|---|---|
Launch | Opens the profile's browser window | Do not click repeatedly while the profile is starting |
Bring to Front | Displays the profile window above other windows | Available only for running profiles |
Close | Closes the profile window | Save unsubmitted webpage content first |
Control Multiple Profiles
- Select the profiles to control by clicking their cards, or use
Select Allfor the current list. - Click
Launchto open selected profiles that are not running. - Click
Closeto close selected profiles that are running.
Close All ignores the current selection and closes every profile open in the client. Before using it, save work in every browser window.
Quick Launch contains only common runtime controls. Return to Browser Profiles for creation, editing, filtering, grouping, or maintenance. See Manage Browser Profiles in Bulk for other batch actions.
Edit Common List Fields
You can maintain frequently used information without opening the full edit form:
- Point to the profile name and click the edit icon.
- Select a destination directly in the
Groupcolumn. - Point to proxy information and click the edit icon.
- Click
Add AccountorEdit Accountto maintain account assignments. - Enter a nonnegative value in the
Ordercolumn. - Point to the notes and click the edit icon.
Availability depends on the current member's profile edit and group permissions.
Use More Actions
Click More in the target row to open the complete menu for an individual profile.
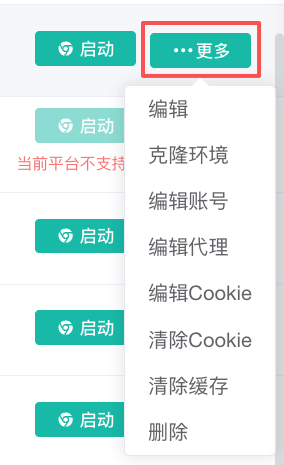
| Action | Purpose | Requirements or considerations |
|---|---|---|
Edit | Opens the complete profile form | Save only, or save and launch/restart afterward |
Clone Profile | Copies the profile configuration and local cache, with an optional destination group | Desktop client only; the source profile must be closed; clone up to 50 at once without exceeding remaining plan capacity |
Edit Account | Creates an account record, selects an existing one, or changes its assignment | Requires account and profile edit permissions; one profile cannot contain multiple accounts for the same platform |
Edit Proxy | Switches between No Proxy, Custom, Proxy API, and Saved Proxy | A custom proxy port must be an integer from 1 to 65535; local testing requires the desktop client |
Edit Cookies | Replaces the profile's cookies with a JSON array | Every item must contain name and value |
Clear Cookies | Clears cloud cookies and, in the desktop client, synchronizes the removal locally | Requires confirmation; websites that rely on the session will sign out |
Clear Cache | Removes the profile's local cache | Desktop client only; the profile must be closed |
Delete | Moves the profile to the Recycle Bin | A running profile cannot be deleted; the desktop client can also remove local cache |
Clone a Profile
- Close the source profile.
- Open its
Moremenu and clickClone Profile. - Enter the number of copies.
- Select a destination group.
- Click
Confirm.
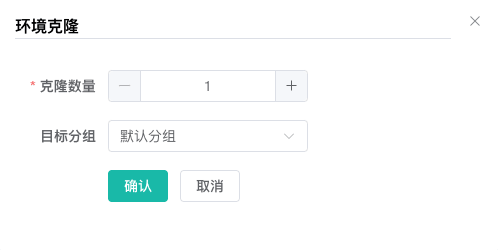
If the profile is cloned successfully but the local cache copy fails, the client reports the cache failure separately. The new profile still exists, but you may need to sign in to websites again or prepare its cache manually.
Maintain the Proxy
The Edit Proxy dialog provides the same four proxy methods as the creation page. Click Confirm after changing the proxy. For an existing proxy, test it before you assign it to a browser profile.
For a custom proxy, the host accepts an IPv4 address or domain and leading or trailing spaces are removed from the username and password. For a Proxy API, the URL must include http:// or https://; both the account and password are required when Credentials is selected. When selecting Saved Proxy, choose a record from the proxy list.
Maintain Accounts and Cookies
Account settings record platform, name, username, and other business information and associate an existing account with the profile. To maintain assignments in bulk, use Assign a Browser Profile. Cookies write website session data directly. Both can contain sensitive information, so restrict profile edit permissions appropriately.
Clearing cookies signs you out of websites that rely on the current session. Clearing cache removes the local browser cache. Confirm the target Profile ID before either operation.
Delete a Profile
Close the browser window before deleting an individual profile. In the desktop client, the confirmation dialog also provides Also delete profile cache. If it is not selected, only the cloud profile record is moved to the Recycle Bin; local cache is not actively removed at this step.
To restore it, go to Use the Browser Profile Recycle Bin. The profile cannot be recovered after permanent deletion or automatic cleanup.
Next Steps
- Manage Browser Profiles in Bulk: Launch, close, move, share, or delete several profiles.
- Use the Browser Profile Recycle Bin: Restore profiles deleted by mistake or permanently remove their data.